1.介绍
RabbitMQ是一个消息代理:它接受和转发消息。您可以将其视为邮局:当您将要发布的邮件放在邮箱中时,您可以确定邮件先生或Mailperson女士最终会将邮件发送给您的收件人。在这个类比中,RabbitMQ是一个邮箱,邮局和邮递员。
RabbitMQ和邮局之间的主要区别在于它不处理纸张,而是接受,存储和转发二进制数据 – 消息。
RabbitMQ和一般的消息传递使用了一些术语。
1.生产只意味着发送,发送消息的程序是生产者:
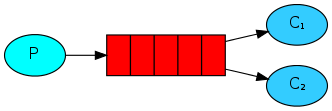
2.queue是RabbitMQ中的邮箱的名称,虽然信息流经RabbitMQ和应用程序,但它们只能存储在queue中。queue仅由主机的存储器&磁盘限制约束,它本质上就是一个大的消息缓冲器。许多生产者可以发送消息到一个队列,并且许多消费者可以尝试从一个队列接收数据。这就是我们代表队列的方式:

3.消费消息与接收消息有类似的意义。一个消费者是一个程序,主要是等待接收信息:

请注意,生产者,消费者和代理不必驻留在同一主机上; 实际上在大多数应用中他们没有。应用程序也可以是生产者和消费者。
2.工作队列(Queue)

工作队列(又称:任务队列)主要思想是避免立即执行资源密集型任务,并且必须等待它完成。相反,我们安排任务稍后完成。我们将任务封装为消息并将其发送到队列。在后台运行的工作进程将弹出任务并最终执行作业。当你运行许多工作程序时,它们之间将共享这些队列。
这个概念在Web应用程序中特别有用,在这些应用程序中,在短HTTP请求窗口期间无法处理复杂任务。
3.发布/订阅(Publish/Subscribe)
工作队列实际上就是将每个任务都交付给一个工作者(只有一个能接收)。在这一部分,我们将做一些完全不同的事情 – 我们将向多个消费者传递信息。此模式称为“发布/订阅”。
为了说明这种模式,我们将构建一个简单的日志记录系统。它将包含两个程序 – 第一个将发出日志消息,第二个将接收和打印它们。
在我们的日志记录系统中,接收程序的每个运行副本都将获取消息。这样我们就可以运行一个接收器并将日志定向到磁盘; 同时我们将能够运行另一个接收器并在屏幕上看到日志。
基本上,发布的日志消息将被广播给所有接收者。
Exchanges
我们向队列发送消息和从队列接收消息。现在是时候在RabbitMQ中引入完整的消息传递模型了。
RabbitMQ中消息传递模型的核心思想是生产者永远不会将任何消息直接发送到队列。实际上,生产者通常甚至不知道消息是否会被传递到任何队列。
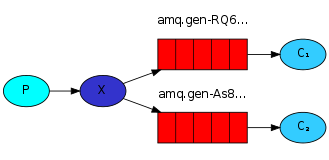
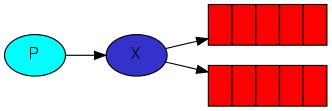
相反,生产者只能向exchange发送消息。exchange是一件非常简单的事情。一方面,它接收来自生产者的消息,另一方面将它们推送到Queue。exchanges必须确切知道如何处理它收到的消息。它应该附加到特定队列吗?它应该附加到许多队列吗?或者它应该被丢弃。其规则由exchange类型定义 。
有几种交换类型可供选择:direct,topic,headers 和fanout。我们将专注于最后一个 – fanout。让我们创建一个这种类型的exchange,并将其称为logs:
channel.exchangeDeclare("logs", "fanout");
fanout exchange非常简单。正如您可能从名称中猜到的那样,它只是将收到的所有消息广播到它知道的所有队列中。而这正是我们记录器所需要的。
现在,我们可以发布到我们的命名交换:
channel.basicPublish("logs","",null,message.getBytes());
临时队列
能够命名队列对我们来说至关重要 – 我们需要将工作人员指向同一个队列。当您想要在生产者和消费者之间共享队列时,为队列命名非常重要。
但我们的记录器并非如此。我们希望了解所有日志消息,而不仅仅是它们的一部分。我们也只对目前流动的消息感兴趣,而不是旧消息。要解决这个问题,我们需要两件事。
首先,每当我们连接到RabbitMQ时,我们都需要一个新的空队列。为此,我们可以使用随机名称创建队列,或者更好 – 让服务器为我们选择随机队列名称。
其次,一旦我们断开消费者,就应该自动删除队列。
在Java客户端中,当我们没有向queueDeclare()提供参数时,我们使用生成的名称创建一个非持久的,独占的并能勾自动删除队列:
String queueName = channel.queueDeclare().getQueue();
此时,queueName包含随机队列名称。例如:它可能看起来像amq.gen-JzTY20BRgKO-HjmUJj0wLg。
绑定队列

我们已经创建了一个fanout exchange和一个队列。现在我们需要告诉exchange将消息发送到我们的队列。exchange和队列之间的关系称为绑定。
channel.queueBind(queueName, "logs", "");
从现在开始,logs exchange会将消息附加到我们的队列中。
列出绑定
你可以使用rabbitmqctl列出现有的绑定
rabbitmqctl list_bindings
把它们放在一起

以上的教材都来自官方文档的翻译,原文请查阅:
https://www.rabbitmq.com/getstarted.html
4.集成
maven
<!-- https://mvnrepository.com/artifact/com.rabbitmq/amqp-client -->
<dependency>
    <groupId>com.rabbitmq</groupId>
    <artifactId>amqp-client</artifactId>
    <version>5.7.0</version>
</dependency>
配置生产者
private static final String host = "127.0.0.1";
private static final int prot = 5672;
/**
 * 缓存Chanel
 */
private Map<String, Channel> producerMap = new ConcurrentHashMap<>();

/**
 * 连接工厂
 */
private ConnectionFactory factory;

private Connection connection;
private Channel channel;

@Override
public void afterPropertiesSet() throws Exception {
    factory = new ConnectionFactory();
    factory.setHost(host);
    factory.setPort(prot);
}

/**
 * 获取一个连接,如果为空或断开了连接则重新实例化
 *
 * @return Connection
 * @throws Exception
 */
@Override
public Connection getConnection() throws Exception {
    if (connection == null || !connection.isOpen()) {
        connection = factory.newConnection();
    }
    return connection;
}

/**
 * 返回一个通道
 *
 * @return Channel
 * @throws Exception
 */
@Override
public Channel getChannel() throws Exception {
    if (channel == null || !channel.isOpen()) {
        channel = this.getConnection().createChannel();
    }
    return channel;
}

/**
 * 创建一个生产者,如果缓存中没有,则重新创建
 *
 * @param exchange Queue name|exchange name
 * @param type     queue|fanout|topic|headers|direct
 * @param durable  是否持久性
 * @return Channel
 * @throws Exception
 */
@Override
public Channel createProducer(String exchange, String type, boolean durable) throws Exception {
    if (producerMap.containsKey(exchange + type + durable)) {
        logger("producer by cache.");
        Channel c1 = producerMap.get(exchange + type + durable);
        if (c1.isOpen()) {
            return c1;
        }
    }

    Channel c = this.getChannel();
    if (type == null || queue.equals(type)) {
        c.queueDeclare(exchange, durable, false, false, null);
    } else {
        c.exchangeDeclare(exchange, type, durable);
    }
    producerMap.put(exchange + type + durable, c);
    return c;
}

/**
 * 发送一条消息
 *
 * @param name    Queue name|exchange name
 * @param type    queue|fanout|topic|headers|direct
 * @param message content
 * @return boolean
 * @throws Exception
 */
@Override
public boolean send(String name, String type, String message) throws Exception {
    try {
        if (type == null || queue.equals(type)) {
            this.getProducer(name, type).basicPublish("", name, null, message.getBytes());
        } else {
            this.getProducer(name, type).basicPublish(name, "", null, message.getBytes());
        }
        return true;
    } catch (Exception e) {
        e.printStackTrace();
    }
    return false;
}
配置消费者
/**
 * 添加一个exchange监听器
 *
 * @param exchange exchange name
 * @param autoAck  是否自动响应
 * @param listener DeliverCallback监听器
 */
@Override
public void addExchangeListener(String exchange, boolean autoAck, DeliverCallback listener) {
    try {
        Channel c = this.getChannel();
        String queue = c.queueDeclare().getQueue();
        c.queueBind(queue, exchange, "");
        c.basicConsume(queue, autoAck, listener, e -> {
            logger("exchange error:" + e);
        });
    } catch (Exception e) {
        e.printStackTrace();
    }
}

/**
 * 添加一个Queue监听器
 *
 * @param queue    Queue name
 * @param autoAck  是否自动响应
 * @param listener DeliverCallback监听器
 */
@Override
public void addQueueListener(String queue, boolean autoAck, DeliverCallback listener) {
    try {
        this.getProducer(queue).basicConsume(queue, autoAck, listener, e -> {
            logger("queue error:" + e);
        });
    } catch (Exception e) {
        e.printStackTrace();
    }
}
因为exchange需要绑定临时队列,所以就用两个方法来分开绑定监听。
测试代码
@RestController
@RequestMapping(value = "/test")
public class TestRabbitMQController {

    private static final Logger logger = Logger.getLogger("RabbitMQ>");

    @Resource
    private IRabbitMQService rabbitMQService;


    /**
     * http://localhost:8180/test/rabbitmq/pub/add?name=lan.queue&type=queue
     * http://localhost:8180/test/rabbitmq/pub/add?name=lan.fanout&type=fanout
     * http://localhost:8180/test/rabbitmq/pub/add?name=lan.topic&type=topic
     *
     * @param request
     * @return
     */
    @RequestMapping(value = "/rabbitmq/pub/add")
    public ResultResp<Void> queue(HttpServletRequest request) {
        ResultResp<Void> resp = new ResultResp<>();

        String name = request.getParameter("name");
        String type = request.getParameter("type");

        String msg = "test RabbitMQ " + type + " " + name + " " + DateTimeUtils.getTime();
        try {
            rabbitMQService.send(name, type, msg);
            resp.setInfo(msg);
        } catch (Exception e) {
            e.printStackTrace();
            resp.setInfo(e.getMessage());
        }

        return resp;
    }

    /**
     * http://localhost:8180/test/rabbitmq/sub/add?id=100&name=lan.queue&type=queue
     * http://localhost:8180/test/rabbitmq/sub/add?id=101&name=lan.queue&type=queue
     * http://localhost:8180/test/rabbitmq/sub/add?id=102&name=lan.queue&type=queue
     *
     * http://localhost:8180/test/rabbitmq/sub/add?id=103&name=lan.fanout&type=fanout
     * http://localhost:8180/test/rabbitmq/sub/add?id=104&name=lan.fanout&type=fanout
     * http://localhost:8180/test/rabbitmq/sub/add?id=105&name=lan.fanout&type=fanout
     *
     * http://localhost:8180/test/rabbitmq/sub/add?id=106&name=lan.topic&type=topic
     * http://localhost:8180/test/rabbitmq/sub/add?id=107&name=lan.topic&type=topic
     * http://localhost:8180/test/rabbitmq/sub/add?id=108&name=lan.topic&type=topic
     *
     * @param request
     * @return
     */
    @RequestMapping(value = "/rabbitmq/sub/add")
    public ResultResp<Void> topic(HttpServletRequest request) {
        ResultResp<Void> resp = new ResultResp<>();

        String id = request.getParameter("id");
        String name = request.getParameter("name");
        String type = request.getParameter("type");
        try {
            rabbitMQService.addListener(name, type, (s, c) -> {
                logger.info(id + "# message:" + new String(c.getBody()) + ", routing:" + c.getEnvelope().getRoutingKey());
            });
            resp.setInfo(id);
        } catch (Exception e) {
            e.printStackTrace();
            resp.setInfo(e.getMessage());
        }

        return resp;
    }
}
5.完整代码
RabbitMQService接口
package com.lanxinbase.system.service.resource;

import com.rabbitmq.client.Channel;
import com.rabbitmq.client.Connection;
import com.rabbitmq.client.DeliverCallback;

import java.io.IOException;

/**
 * Created by alan on 2019/5/2.
 */
public interface IRabbitMQService {

    Connection getConnection() throws Exception;

    Channel getChannel() throws Exception;

    Channel getProducer(String name) throws Exception;

    Channel getProducer(String name, String type) throws Exception;

    Channel createProducer(String name, String type, boolean durable) throws Exception;

    boolean send(String name, String message) throws Exception;

    boolean send(String name, String type, String message) throws Exception;

    void addListener(String name, String type,DeliverCallback listener);

    void addListener(String name, String type, boolean autoAck, DeliverCallback listener);

    void addExchangeListener(String exchange, boolean autoAck, DeliverCallback listener);

    void addQueueListener(String queue, boolean autoAck, DeliverCallback listener);


}
RabbitMQService实现
package com.lanxinbase.system.service;

import com.lanxinbase.system.basic.CompactService;
import com.lanxinbase.system.service.resource.IRabbitMQService;
import com.rabbitmq.client.Channel;
import com.rabbitmq.client.Connection;
import com.rabbitmq.client.ConnectionFactory;
import com.rabbitmq.client.DeliverCallback;
import org.springframework.beans.factory.DisposableBean;
import org.springframework.beans.factory.InitializingBean;
import org.springframework.stereotype.Service;

import java.util.Map;
import java.util.concurrent.ConcurrentHashMap;

/**
 * Created by alan on 2019/5/3.
 * <p>
 * <p>
 * 0.需要下载Erlang,并且设置好ERLANG_HOME的环境变量,类似于JDK的配置方式。
 * 1.下载RabbitMQ
 * 3.运行RabbitMQ,like this:./sbin/rabbitmq-server.bat
 * <p>
 * Queue Test:
 * 生产者:
 * http://localhost:8180/test/rabbitmq/pub/add?name=lan.queue&type=queue
 * <p>
 * rabbitMQService.send(name, type, msg);
 * <p>
 * 消费者(3个):
 * http://localhost:8180/test/rabbitmq/sub/add?id=100&name=lan.queue&type=queue
 * http://localhost:8180/test/rabbitmq/sub/add?id=101&name=lan.queue&type=queue
 * http://localhost:8180/test/rabbitmq/sub/add?id=102&name=lan.queue&type=queue
 * <p>
 * rabbitMQService.addListener(name, type, (s, c) -> {
 * logger.info(id + "# message:" + new String(c.getBody()) + ", routing:" + c.getEnvelope().getRoutingKey());
 * });
 * <p>
 * Queue运行日志:
 * 03-May-2019 22:24:37.773 lambda$topic$0 101# message:test RabbitMQ queue lan.queue 1556893477772, routing:lan.queue
 * 03-May-2019 22:24:38.467 lambda$topic$0 102# message:test RabbitMQ queue lan.queue 1556893478466, routing:lan.queue
 * 03-May-2019 22:24:39.376 lambda$topic$0 100# message:test RabbitMQ queue lan.queue 1556893479374, routing:lan.queue
 * <p>
 * 这里生产者生产了3条信息,Queue消息不会丢失,如果生产者生产消息的时候没有消费者进入,那么消息会等到消费者进入后发送给消费者。
 * 如果有多个消费者监听同一个Queue,那么则会按照某种算法,将消息发送给其中一个消费者,如果接收成功后,通道会自动删除消息。
 * <p>
 * Exchange Test:
 * 生产者:
 * http://localhost:8180/test/rabbitmq/pub/add?name=lan.fanout&type=fanout
 * http://localhost:8180/test/rabbitmq/pub/add?name=lan.topic&type=topic
 * <p>
 * rabbitMQService.send(name, type, msg);
 * <p>
 * 消费者:
 * http://localhost:8180/test/rabbitmq/sub/add?id=103&name=lan.fanout&type=fanout
 * http://localhost:8180/test/rabbitmq/sub/add?id=104&name=lan.fanout&type=fanout
 * http://localhost:8180/test/rabbitmq/sub/add?id=105&name=lan.fanout&type=fanout
 * <p>
 * http://localhost:8180/test/rabbitmq/sub/add?id=106&name=lan.topic&type=topic
 * http://localhost:8180/test/rabbitmq/sub/add?id=107&name=lan.topic&type=topic
 * http://localhost:8180/test/rabbitmq/sub/add?id=108&name=lan.topic&type=topic
 * <p>
 * rabbitMQService.addListener(name, type, (s, c) -> {
 * logger.info(id + "# message:" + new String(c.getBody()) + ", routing:" + c.getEnvelope().getRoutingKey());
 * });
 * <p>
 * Exchange运行日志:
 * 03-May-2019 22:24:42.424 lambda$topic$0 104# message:test RabbitMQ fanout lan.fanout 1556893482420, routing:
 * 03-May-2019 22:24:42.425 lambda$topic$0 103# message:test RabbitMQ fanout lan.fanout 1556893482420, routing:
 * 03-May-2019 22:24:42.425 lambda$topic$0 105# message:test RabbitMQ fanout lan.fanout 1556893482420, routing:
 * <p>
 * 03-May-2019 22:24:46.077 lambda$topic$0 107# message:test RabbitMQ topic lan.topic 1556893486075, routing:
 * 03-May-2019 22:24:46.077 lambda$topic$0 108# message:test RabbitMQ topic lan.topic 1556893486075, routing:
 * 03-May-2019 22:24:46.077 lambda$topic$0 106# message:test RabbitMQ topic lan.topic 1556893486075, routing:
 * <p>
 * 从日志时间上可以看的出,生产者的消息,全部同时发送给了所有消费者。如果生产者生产消息的时候没有消费者进入,那么消息会丢失。
 * 当有消费者监听Topic时,可以收到消息,如果同时有多个消费者监听同一个topic,那么消息将分别发送给各个消费者。
 *
 * @See TestRabbitMQController
 */

@Service
public class RabbitMQService extends CompactService implements InitializingBean, DisposableBean, IRabbitMQService {

    private static final String host = "127.0.0.1";
    private static final int prot = 5672;

    public static final String TOPIC_DEFAULT = "lan.topic";
    public static final String DIRECT_DEFAULT = "lan.direct";
    public static final String HEADERS_DEFAULT = "lan.headers";
    public static final String FANOUT_DEFAULT = "lan.fanout";

    public static final String QUEUE_DEFAULT = "lan.queue";

    public static final String direct = "direct";
    public static final String topic = "topic";
    public static final String fanout = "fanout";
    public static final String headers = "headers";
    public static final String queue = "queue";

    /**
     * 缓存Chanel
     */
    private Map<String, Channel> producerMap = new ConcurrentHashMap<>();

    /**
     * 连接工厂
     */
    private ConnectionFactory factory;

    private Connection connection;
    private Channel channel;

    public RabbitMQService() {

    }

    @Override
    public void afterPropertiesSet() throws Exception {
        factory = new ConnectionFactory();
        factory.setHost(host);
        factory.setPort(prot);
    }

    /**
     * 获取一个连接,如果为空或断开了连接则重新实例化
     *
     * @return Connection
     * @throws Exception
     */
    @Override
    public Connection getConnection() throws Exception {
        if (connection == null || !connection.isOpen()) {
            connection = factory.newConnection();
        }
        return connection;
    }

    /**
     * 返回一个通道
     *
     * @return Channel
     * @throws Exception
     */
    @Override
    public Channel getChannel() throws Exception {
        if (channel == null || !channel.isOpen()) {
            channel = this.getConnection().createChannel();
        }
        return channel;
    }

    /**
     * 获取一个生产者
     *
     * @param name Queue name|exchange name
     * @return Channel
     * @throws Exception
     */
    @Override
    public Channel getProducer(String name) throws Exception {
        return this.getProducer(name, queue);
    }

    /**
     * 获取一个生产者
     *
     * @param name Queue name|exchange name
     * @param type queue|fanout|topic|headers|direct
     * @return Channel
     * @throws Exception
     */
    @Override
    public Channel getProducer(String name, String type) throws Exception {
        return this.createProducer(name, type, false);
    }

    /**
     * 创建一个生产者,如果缓存中没有,则重新创建
     *
     * @param exchange Queue name|exchange name
     * @param type     queue|fanout|topic|headers|direct
     * @param durable  是否持久性
     * @return Channel
     * @throws Exception
     */
    @Override
    public Channel createProducer(String exchange, String type, boolean durable) throws Exception {
        if (producerMap.containsKey(exchange + type + durable)) {
            logger("producer by cache.");
            Channel c1 = producerMap.get(exchange + type + durable);
            if (c1.isOpen()) {
                return c1;
            }
        }

        Channel c = this.getChannel();
        if (type == null || queue.equals(type)) {
            c.queueDeclare(exchange, durable, false, false, null);
        } else {
            c.exchangeDeclare(exchange, type, durable);
        }
        producerMap.put(exchange + type + durable, c);
        return c;
    }


    /**
     * 发送一条消息,默认只发送queue消息
     *
     * @param name    Queue name|exchange name
     * @param message content
     * @return boolean
     * @throws Exception
     */
    @Override
    public boolean send(String name, String message) throws Exception {
        return this.send(name, queue, message);
    }

    /**
     * 发送一条消息
     *
     * @param name    Queue name|exchange name
     * @param type    queue|fanout|topic|headers|direct
     * @param message content
     * @return boolean
     * @throws Exception
     */
    @Override
    public boolean send(String name, String type, String message) throws Exception {
        try {
            if (type == null || queue.equals(type)) {
                this.getProducer(name, type).basicPublish("", name, null, message.getBytes());
            } else {
                this.getProducer(name, type).basicPublish(name, "", null, message.getBytes());
            }
            return true;
        } catch (Exception e) {
            e.printStackTrace();
        }
        return false;
    }

    /**
     * 设置消费者监听
     *
     * @param name     Queue name|exchange name
     * @param type     queue|fanout|topic|headers|direct
     * @param listener DeliverCallback监听器
     */
    @Override
    public void addListener(String name, String type, DeliverCallback listener) {
        this.addListener(name, type, true, listener);
    }

    /**
     * 设置消费者监听
     *
     * @param name     Queue name|exchange name
     * @param type     queue|fanout|topic|headers|direct
     * @param autoAck  是否自动响应
     * @param listener DeliverCallback监听器
     */
    @Override
    public void addListener(String name, String type, boolean autoAck, DeliverCallback listener) {
        if (type == null || queue.equals(type)) {
            this.addQueueListener(name, autoAck, listener);
        } else {
            this.addExchangeListener(name, autoAck, listener);
        }
    }

    /**
     * 添加一个exchange监听器
     *
     * @param exchange exchange name
     * @param autoAck  是否自动响应
     * @param listener DeliverCallback监听器
     */
    @Override
    public void addExchangeListener(String exchange, boolean autoAck, DeliverCallback listener) {
        try {
            Channel c = this.getChannel();
            String queue = c.queueDeclare().getQueue();
            c.queueBind(queue, exchange, "");
            c.basicConsume(queue, autoAck, listener, e -> {
                logger("exchange error:" + e);
            });
        } catch (Exception e) {
            e.printStackTrace();
        }
    }

    /**
     * 添加一个Queue监听器
     *
     * @param queue    Queue name
     * @param autoAck  是否自动响应
     * @param listener DeliverCallback监听器
     */
    @Override
    public void addQueueListener(String queue, boolean autoAck, DeliverCallback listener) {
        try {
            this.getProducer(queue).basicConsume(queue, autoAck, listener, e -> {
                logger("queue error:" + e);
            });
        } catch (Exception e) {
            e.printStackTrace();
        }
    }

    @Override
    public void destroy() throws Exception {
        channel.close();
        connection.close();
    }
}
RabbitMQService服务类每个方法都写了说明,这里就不解释了。


近期评论