前言
在大型的企业应用中,或多或少都会存在大量的任务需要处理,如邮件批量通知所有将要过期的会员等等。而在批量处理任务的过程中,又需要注意很多细节,如任务异常、性能瓶颈等等。那么,使用一款优秀的框架总比我们自己重复地造轮子要好得多一些。
我所在的物联网云平台部门就有这么一个需求,需要实现批量下发命令给百万设备。为了防止枯燥乏味,下面就让我们先通过Spring Batch框架简单地实现一下这个功能,再来详细地介绍这款框架!
小试牛刀
Demo代码:https://github.com/wudashan/spring-batch-demo.git
引入依赖
首先我们需要引入对Spring Batch的依赖,在pom.xml文件加入下面的代码:
|
1
2
3
4
5
|
<dependency>
<groupId>org.springframework.batch</groupId>
<artifactId>spring-batch-core</artifactId>
<version>3.0.8.RELEASE</version>
</dependency>
|
装载Bean
其次,我们需要在resources目录下,创建applicationContext.xml文件,用于自动注入我们需要的类:
|
1
2
3
4
5
6
7
8
9
10
11
12
13
14
15
16
17
18
19
20
21
22
23
|
<beans xmlns="http://www.springframework.org/schema/beans"
xmlns:xsi="http://www.w3.org/2001/XMLSchema-instance"
xsi:schemaLocation="
http:
http:
<!-- 事务管理器 -->
<bean id="transactionManager" class="org.springframework.batch.support.transaction.ResourcelessTransactionManager"/>
<!-- 任务仓库 -->
<bean id="jobRepository" class="org.springframework.batch.core.repository.support.MapJobRepositoryFactoryBean">
<property name="transactionManager" ref="transactionManager"/>
</bean>
<!-- 任务加载器 -->
<bean id="jobLauncher" class="org.springframework.batch.core.launch.support.SimpleJobLauncher">
<property name="jobRepository" ref="jobRepository"/>
</bean>
</beans>
|
有了上面声明的transactionManager、jobRepository、jobLauncher,我们就可以执行批量任务啦!不过,我们还需要创建一个任务。在Spring Batch框架中,一个任务Job由一个或者多个步骤Step,而步骤又由读操作Reader、处理操作Processor、写操作Writer组成,下面我们分别创建它们。
创建Reader
既然是读操作,那么肯定要有能读的数据源,方便起见,我们直接在resources目录下创建一个batch-data.csv文件,内容如下:
|
1
2
3
4
5
6
7
8
9
10
|
1,PENDING
2,PENDING
3,PENDING
4,PENDING
5,PENDING
6,PENDING
7,PENDING
8,PENDING
9,PENDING
10,PENDING
|
非常简单,其中第一列代表着命令的id,第二列代表着命令的当前状态。也就是说,现在有10条缓存的命令,需要下发给设备。
读操作需要实现ItemReader<T>接口,框架提供了一个现成的实现类FlatFileItemReader。使用该类需要设置Resource和LineMapper。Resource代表着数据源,即我们的batch-data.csv文件;LineMapper则表示如何将文件的每行数据转成对应的DTO对象。
创建DTO对象
由于我们的数据源是命令数据,所以我们需要创建一个DeviceCommand.java文件,代码如下:
|
1
2
3
4
5
6
7
8
9
10
11
12
13
14
15
16
17
18
19
20
21
22
|
public class DeviceCommand {
private String id;
private String status;
public String getId() {
return id;
}
public void setId(String id) {
this.id = id;
}
public String getStatus() {
return status;
}
public void setStatus(String status) {
this.status = status;
}
}
|
自定义LineMapper
我们需要自己实现一个LineMapper实现类,用于将batch-data.csv文件的每行数据,转成程序方便处理的DeviceCommand对象。
|
1
2
3
4
5
6
7
8
9
10
11
12
13
14
15
16
17
18
19
20
21
22
23
|
public class HelloLineMapper implements LineMapper<DeviceCommand> {
@Override
public DeviceCommand mapLine(String line, int lineNumber) throws Exception {
String[] args = line.split(",");
DeviceCommand deviceCommand = new DeviceCommand();
deviceCommand.setId(args[0]);
deviceCommand.setStatus(args[1]);
return deviceCommand;
}
}
|
创建Processor
读完数据后,我们就需要处理数据了。既然我们前面从文件里读取了待下发的命令,那么在这里下发命令给设备是最好的时机。处理操作需要实现ItemProcessor<I, O>接口,我们自己实现一个HelloItemProcessor.java即可,代码如下:
|
1
2
3
4
5
6
7
8
9
10
11
12
13
14
15
16
17
|
public class HelloItemProcessor implements ItemProcessor<DeviceCommand, DeviceCommand> {
@Override
public DeviceCommand process(DeviceCommand deviceCommand) throws Exception {
System.out.println("send command to device, id=" + deviceCommand.getId());
deviceCommand.setStatus("SENT");
return deviceCommand;
}
}
|
创建Writer
处理完数据后,我们需要更新命令状态到文件里,用于记录我们已经下发。与读文件类似,我们需要实现ItemWriter<T>接口,框架也提供了一个现成的实现类FlatFileItemWriter。使用该类需要设置Resource和LineAggregator。Resource代表着数据源,即我们的batch-data.csv文件;LineAggregator则表示如何将DTO对象转成字符串保存到文件的每行。
自定义LineAggregator
我们需要自己实现一个LineAggregator实现类,用于将DeviceCommand对象转成字符串,保存到batch-data.csv文件。
|
1
2
3
4
5
6
7
8
9
10
11
12
13
|
public class HelloLineAggregator implements LineAggregator<DeviceCommand> {
@Override
public String aggregate(DeviceCommand deviceCommand) {
StringBuffer sb = new StringBuffer();
sb.append(deviceCommand.getId());
sb.append(",");
sb.append(deviceCommand.getStatus());
return sb.toString();
}
}
|
主程序
那么,完事具备,只欠东风!接下面我们在主程序Main.java里实现我们的批量命令下发功能!代码如下:
|
1
2
3
4
5
6
7
8
9
10
11
12
13
14
15
16
17
18
19
20
21
22
23
24
25
26
27
28
29
30
31
32
33
34
35
36
37
38
39
40
41
42
43
44
45
46
47
48
|
public class Main {
public static void main(String[] args) throws Exception {
String[] configLocations = {"applicationContext.xml"};
ApplicationContext applicationContext = new ClassPathXmlApplicationContext(configLocations);
JobLauncher jobLauncher = applicationContext.getBean(JobLauncher.class);
JobRepository jobRepository = applicationContext.getBean(JobRepository.class);
PlatformTransactionManager transactionManager = applicationContext.getBean(PlatformTransactionManager.class);
FlatFileItemReader<DeviceCommand> flatFileItemReader = new FlatFileItemReader<>();
flatFileItemReader.setResource(new FileSystemResource("src/main/resources/batch-data.csv"));
flatFileItemReader.setLineMapper(new HelloLineMapper());
HelloItemProcessor helloItemProcessor = new HelloItemProcessor();
FlatFileItemWriter<DeviceCommand> flatFileItemWriter = new FlatFileItemWriter<>();
flatFileItemWriter.setResource(new FileSystemResource("src/main/resources/batch-data.csv"));
flatFileItemWriter.setLineAggregator(new HelloLineAggregator());
StepBuilderFactory stepBuilderFactory = new StepBuilderFactory(jobRepository, transactionManager);
Step step = stepBuilderFactory.get("step")
.<DeviceCommand, DeviceCommand>chunk(1)
.reader(flatFileItemReader)
.processor(helloItemProcessor)
.writer(flatFileItemWriter)
.build();
JobBuilderFactory jobBuilderFactory = new JobBuilderFactory(jobRepository);
Job job = jobBuilderFactory.get("job")
.start(step)
.build();
jobLauncher.run(job, new JobParameters());
}
}
|
执行main方法之后,屏幕将会输出下面信息:
|
1
2
3
4
5
6
7
8
9
10
|
send command to device, id=1
send command to device, id=2
send command to device, id=3
send command to device, id=4
send command to device, id=5
send command to device, id=6
send command to device, id=7
send command to device, id=8
send command to device, id=9
send command to device, id=10
|
再查看batch-data.csv文件,将会发现命令状态全部更新为SENT:
|
1
2
3
4
5
6
7
8
9
10
|
1,SENT
2,SENT
3,SENT
4,SENT
5,SENT
6,SENT
7,SENT
8,SENT
9,SENT
10,SENT
|
至此,我们的批量命令下发全部成功!可以发现,使用Spring Batch框架来实现批处理非常的轻量,当然这只是它所有功能里的冰山一角。
正式介绍
Spring Batch在官网是这样一句话介绍自己的:A lightweight, comprehensive batch framework designed to enable the development of robust batch applications vital for the daily operations of enterprise systems.(一款轻量的、全面的批处理框架,用于开发强大的日常运营的企业级批处理应用程序。)
框架主要有以下功能:
- Transaction management(事务管理)
- Chunk based processing(基于块的处理)
- Declarative I/O(声明式的输入输出)
- Start/Stop/Restart(启动/停止/再启动)
- Retry/Skip(重试/跳过)
如果你的批处理程序需要使用上面的功能,那就大胆地使用它吧!
框架全貌
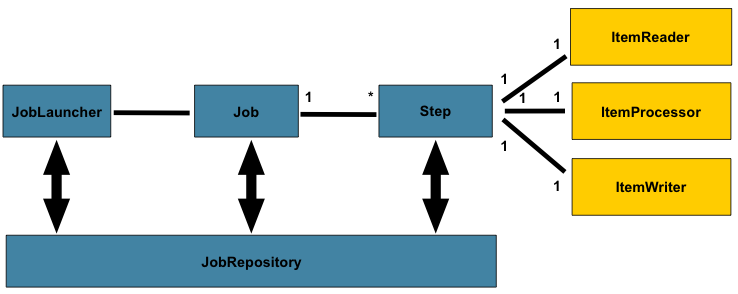
框架一共有4个主要角色:JobLauncher是任务启动器,通过它来启动任务,可以看做是程序的入口。Job代表着一个具体的任务。Step代表着一个具体的步骤,一个Job可以包含多个Step(想象把大象放进冰箱这个任务需要多少个步骤你就明白了)。JobRepository是存储数据的地方,可以看做是一个数据库的接口,在任务执行的时候需要通过它来记录任务状态等等信息。
JobLauncher
JobLauncher是任务启动器,该接口只有一个run方法:
|
1
2
3
4
5
|
public interface JobLauncher {
public JobExecution run(Job job, JobParameters jobParameters) throws JobExecutionAlreadyRunningException, JobRestartException, JobInstanceAlreadyCompleteException, JobParametersInvalidException;
}
|
除了传入Job对象之外,还需要传入JobParameters对象,后续讲到Job再解释为什么要多传一个JobParameters。通过JobLauncher可以在Java程序中调用批处理任务,也可以通过命令行或者其他框架(如定时调度框架Quartz、Web后台框架Spring MVC)中调用批处理任务。Spring Batch框架提供了一个JobLauncher的实现类SimpleJobLauncher。
Job
Job代表着一个任务,一个Job与一个或者多个JobInstance相关联,而一个JobInstance又与一个或者多个JobExecution相关联:
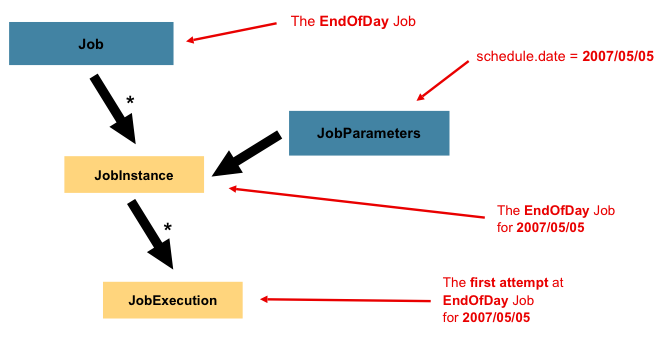
考虑到任务可能不是只执行一次就再也不执行了,更多的情况可能是定时任务,如每天执行一次,每个星期执行一次等等,那么为了区分每次执行的任务,框架使用了JobInstance。如上图所示,Job是一个EndOfDay(每天最后时刻执行的任务),那么其中一个JobInstance就代表着2007年5月5日那天执行的任务实例。框架通过在执行JobLauncher.run(Job, JobParameters)方法时传入的JobParameters来区分是哪一天的任务。
由于2007年5月5日那天执行的任务可能不会一次就执行完成,比如中途被停止,或者出现异常导致中断,需要多执行几次才能完成,所以框架使用了JobExecution来表示每次执行的任务。
Step
一个Job任务可以分为几个Step步骤,与JobExection相同,每次执行Step的时候使用StepExecution来表示执行的步骤。每一个Step还包含着一个ItemReader、ItemProcessor、ItemWriter,下面分别介绍这三者。
ItemReader
ItemReader代表着读操作,其接口如下:
|
1
2
3
4
5
|
public interface ItemReader<T> {
T read() throws Exception, UnexpectedInputException, ParseException, NonTransientResourceException;
}
|
框架已经提供了多种ItemReader接口的实现类,包括对文本文件、XML文件、数据库、JMS消息等读的处理,当然我们也可以自己实现该接口。
ItemProcessor
ItemReader代表着处理操作,其接口如下:
|
1
2
3
4
5
|
public interface ItemProcessor<I, O> {
O process(I item) throws Exception;
}
|
process方法的形参传入I类型的对象,通过处理后返回O型的对象。开发者可以实现自己的业务代码来对数据进行处理。
ItemWriter
ItemReader代表着写操作,其接口如下:
|
1
2
3
4
5
|
public interface ItemWriter<T> {
void write(List<? extends T> items) throws Exception;
}
|
框架已经提供了多种ItemWriter接口的实现类,包括对文本文件、XML文件、数据库、JMS消息等写的处理,当然我们也可以自己实现该接口。
JobRepository
JobRepository用于存储任务执行的状态信息,比如什么时间点执行了什么任务、任务执行结果如何等等。框架提供了2种实现,一种是通过Map形式保存在内存中,当Java程序重启后任务信息也就丢失了,并且在分布式下无法获取其他节点的任务执行情况;另一种是保存在数据库中,并且将数据保存在下面6张表里:
- BATCH_JOB_INSTANCE
- BATCH_JOB_EXECUTION_PARAMS
- BATCH_JOB_EXECUTION
- BATCH_STEP_EXECUTION
- BATCH_JOB_EXECUTION_CONTEXT
- BATCH_STEP_EXECUTION_CONTEXT
Spring Batch框架的JobRepository支持主流的数据库:DB2、Derby、H2、HSQLDB、MySQL、Oracle、PostgreSQL、SQLServer、Sybase。可爱的是,我司的Gauss数据库也是支持的,只不过需要稍加配置。

近期评论