mysql频繁访问、读写配置

#BEGIN CONFIG INFO
#DESCR: 4GB RAM, InnoDB only, ACID, few connections, heavy queries
#TYPE: SYSTEM
#END CONFIG INFO

#
# This is a MySQL example config file for systems with 4GB of memory
# running mostly MySQL using InnoDB only tables and performing complex
# queries with few connections.
#
# MySQL programs look for option files in a set of
# locations which depend on the deployment platform.
# You can copy this option file to one of those
# locations. For information about these locations, see:
# http://dev.mysql.com/doc/mysql/en/option-files.html
#
# In this file, you can use all long options that a program supports.
# If you want to know which options a program supports, run the program
# with the “–help” option.
#
# More detailed information about the individual options can also be
# found in the manual.
#

#
# The following options will be read by MySQL client applications.
# Note that only client applications shipped by MySQL are guaranteed
# to read this section. If you want your own MySQL client program to
# honor these values, you need to specify it as an option during the
# MySQL client library initialization.
#
[client]
#password = [your_password]
port = 3306
socket = /tmp/mysql.sock

# *** Application-specific options follow here ***

#
# The MySQL server
#
[mysqld]

# generic configuration options
port = 3306
socket = /tmp/mysql.sock

# back_log is the number of connections the operating system can keep in
# the listen queue, before the MySQL connection manager thread has
# processed them. If you have a very high connection rate and experience
# “connection refused” errors, you might need to increase this value.
# Check your OS documentation for the maximum value of this parameter.
# Attempting to set back_log higher than your operating system limit
# will have no effect.
back_log = 50

# Don’t listen on a TCP/IP port at all. This can be a security
# enhancement, if all processes that need to connect to mysqld run
# on the same host. All interaction with mysqld must be made via Unix
# sockets or named pipes.
# Note that using this option without enabling named pipes on Windows
# (via the “enable-named-pipe” option) will render mysqld useless!
#skip-networking

# The maximum amount of concurrent sessions the MySQL server will
# allow. One of these connections will be reserved for a user with
# SUPER privileges to allow the administrator to login even if the
# connection limit has been reached.
max_connections = 100

# Maximum amount of errors allowed per host. If this limit is reached,
# the host will be blocked from connecting to the MySQL server until
# “FLUSH HOSTS” has been run or the server was restarted. Invalid
# passwords and other errors during the connect phase result in
# increasing this value. See the “Aborted_connects” status variable for
# global counter.
max_connect_errors = 10

# The number of open tables for all threads. Increasing this value
# increases the number of file descriptors that mysqld requires.
# Therefore you have to make sure to set the amount of open files
# allowed to at least 4096 in the variable “open-files-limit” in
# section [mysqld_safe]
table_open_cache = 2048

# Enable external file level locking. Enabled file locking will have a
# negative impact on performance, so only use it in case you have
# multiple database instances running on the same files (note some
# restrictions still apply!) or if you use other software relying on
# locking MyISAM tables on file level.
#external-locking

# The maximum size of a query packet the server can handle as well as
# maximum query size server can process (Important when working with
# large BLOBs). enlarged dynamically, for each connection.
max_allowed_packet = 16M

# The size of the cache to hold the SQL statements for the binary log
# during a transaction. If you often use big, multi-statement
# transactions you can increase this value to get more performance. All
# statements from transactions are buffered in the binary log cache and
# are being written to the binary log at once after the COMMIT. If the
# transaction is larger than this value, temporary file on disk is used
# instead. This buffer is allocated per connection on first update
# statement in transaction
binlog_cache_size = 1M

# Maximum allowed size for a single HEAP (in memory) table. This option
# is a protection against the accidential creation of a very large HEAP
# table which could otherwise use up all memory resources.
max_heap_table_size = 64M

# Size of the buffer used for doing full table scans.
# Allocated per thread, if a full scan is needed.
read_buffer_size = 2M

# When reading rows in sorted order after a sort, the rows are read
# through this buffer to avoid disk seeks. You can improve ORDER BY
# performance a lot, if set this to a high value.
# Allocated per thread, when needed.
read_rnd_buffer_size = 16M

# Sort buffer is used to perform sorts for some ORDER BY and GROUP BY
# queries. If sorted data does not fit into the sort buffer, a disk
# based merge sort is used instead – See the “Sort_merge_passes”
# status variable. Allocated per thread if sort is needed.
sort_buffer_size = 8M

# This buffer is used for the optimization of full JOINs (JOINs without
# indexes). Such JOINs are very bad for performance in most cases
# anyway, but setting this variable to a large value reduces the
# performance impact. See the “Select_full_join” status variable for a
# count of full JOINs. Allocated per thread if full join is found
join_buffer_size = 8M

# How many threads we should keep in a cache for reuse. When a client
# disconnects, the client’s threads are put in the cache if there aren’t
# more than thread_cache_size threads from before. This greatly reduces
# the amount of thread creations needed if you have a lot of new
# connections. (Normally this doesn’t give a notable performance
# improvement if you have a good thread implementation.)
thread_cache_size = 8

# This permits the application to give the threads system a hint for the
# desired number of threads that should be run at the same time. This
# value only makes sense on systems that support the thread_concurrency()
# function call (Sun Solaris, for example).
# You should try [number of CPUs]*(2..4) for thread_concurrency
thread_concurrency = 8

# Query cache is used to cache SELECT results and later return them
# without actual executing the same query once again. Having the query
# cache enabled may result in significant speed improvements, if your
# have a lot of identical queries and rarely changing tables. See the
# “Qcache_lowmem_prunes” status variable to check if the current value
# is high enough for your load.
# Note: In case your tables change very often or if your queries are
# textually different every time, the query cache may result in a
# slowdown instead of a performance improvement.
query_cache_size = 64M

# Only cache result sets that are smaller than this limit. This is to
# protect the query cache of a very large result set overwriting all
# other query results.
query_cache_limit = 2M

# Minimum word length to be indexed by the full text search index.
# You might wish to decrease it if you need to search for shorter words.
# Note that you need to rebuild your FULLTEXT index, after you have
# modified this value.
ft_min_word_len = 4

# If your system supports the memlock() function call, you might want to
# enable this option while running MySQL to keep it locked in memory and
# to avoid potential swapping out in case of high memory pressure. Good
# for performance.
#memlock

# Table type which is used by default when creating new tables, if not
# specified differently during the CREATE TABLE statement.
default-storage-engine = MYISAM

# Thread stack size to use. This amount of memory is always reserved at
# connection time. MySQL itself usually needs no more than 64K of
# memory, while if you use your own stack hungry UDF functions or your
# OS requires more stack for some operations, you might need to set this
# to a higher value.
thread_stack = 192K

# Set the default transaction isolation level. Levels available are:
# READ-UNCOMMITTED, READ-COMMITTED, REPEATABLE-READ, SERIALIZABLE
transaction_isolation = REPEATABLE-READ

# Maximum size for internal (in-memory) temporary tables. If a table
# grows larger than this value, it is automatically converted to disk
# based table This limitation is for a single table. There can be many
# of them.
tmp_table_size = 64M

# Enable binary logging. This is required for acting as a MASTER in a
# replication configuration. You also need the binary log if you need
# the ability to do point in time recovery from your latest backup.
log-bin=mysql-bin

# binary logging format – mixed recommended
binlog_format=mixed

# If you’re using replication with chained slaves (A->B->C), you need to
# enable this option on server B. It enables logging of updates done by
# the slave thread into the slave’s binary log.
#log_slave_updates

# Enable the full query log. Every query (even ones with incorrect
# syntax) that the server receives will be logged. This is useful for
# debugging, it is usually disabled in production use.
#log

# Print warnings to the error log file. If you have any problem with
# MySQL you should enable logging of warnings and examine the error log
# for possible explanations.
#log_warnings

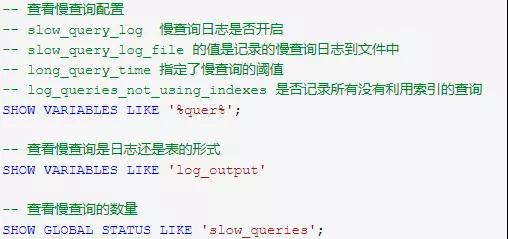
# Log slow queries. Slow queries are queries which take more than the
# amount of time defined in “long_query_time” or which do not use
# indexes well, if log_short_format is not enabled. It is normally good idea
# to have this turned on if you frequently add new queries to the
# system.
slow_query_log

# All queries taking more than this amount of time (in seconds) will be
# trated as slow. Do not use “1” as a value here, as this will result in
# even very fast queries being logged from time to time (as MySQL
# currently measures time with second accuracy only).
long_query_time = 2
# *** Replication related settings
# Unique server identification number between 1 and 2^32-1. This value
# is required for both master and slave hosts. It defaults to 1 if
# “master-host” is not set, but will MySQL will not function as a master
# if it is omitted.
server-id = 1

# Replication Slave (comment out master section to use this)
#
# To configure this host as a replication slave, you can choose between
# two methods :
#
# 1) Use the CHANGE MASTER TO command (fully described in our manual) –
# the syntax is:
#
# CHANGE MASTER TO MASTER_HOST=<host>, MASTER_PORT=<port>,
# MASTER_USER=<user>, MASTER_PASSWORD=<password> ;
#
# where you replace <host>, <user>, <password> by quoted strings and
# <port> by the master’s port number (3306 by default).
#
# Example:
#
# CHANGE MASTER TO MASTER_HOST=’125.564.12.1′, MASTER_PORT=3306,
# MASTER_USER=’joe’, MASTER_PASSWORD=’secret';
#
# OR
#
# 2) Set the variables below. However, in case you choose this method, then
# start replication for the first time (even unsuccessfully, for example
# if you mistyped the password in master-password and the slave fails to
# connect), the slave will create a master.info file, and any later
# changes in this file to the variable values below will be ignored and
# overridden by the content of the master.info file, unless you shutdown
# the slave server, delete master.info and restart the slaver server.
# For that reason, you may want to leave the lines below untouched
# (commented) and instead use CHANGE MASTER TO (see above)
#
# required unique id between 2 and 2^32 – 1
# (and different from the master)
# defaults to 2 if master-host is set
# but will not function as a slave if omitted
#server-id = 2
#
# The replication master for this slave – required
#master-host = <hostname>
#
# The username the slave will use for authentication when connecting
# to the master – required
#master-user = <username>
#
# The password the slave will authenticate with when connecting to
# the master – required
#master-password = <password>
#
# The port the master is listening on.
# optional – defaults to 3306
#master-port = <port>

# Make the slave read-only. Only users with the SUPER privilege and the
# replication slave thread will be able to modify data on it. You can
# use this to ensure that no applications will accidently modify data on
# the slave instead of the master
#read_only
#*** MyISAM Specific options
# Size of the Key Buffer, used to cache index blocks for MyISAM tables.
# Do not set it larger than 30% of your available memory, as some memory
# is also required by the OS to cache rows. Even if you’re not using
# MyISAM tables, you should still set it to 8-64M as it will also be
# used for internal temporary disk tables.
key_buffer_size = 32M

# MyISAM uses special tree-like cache to make bulk inserts (that is,
# INSERT … SELECT, INSERT … VALUES (…), (…), …, and LOAD DATA
# INFILE) faster. This variable limits the size of the cache tree in
# bytes per thread. Setting it to 0 will disable this optimisation. Do
# not set it larger than “key_buffer_size” for optimal performance.
# This buffer is allocated when a bulk insert is detected.
bulk_insert_buffer_size = 64M

# This buffer is allocated when MySQL needs to rebuild the index in
# REPAIR, OPTIMIZE, ALTER table statements as well as in LOAD DATA INFILE
# into an empty table. It is allocated per thread so be careful with
# large settings.
myisam_sort_buffer_size = 128M

# The maximum size of the temporary file MySQL is allowed to use while
# recreating the index (during REPAIR, ALTER TABLE or LOAD DATA INFILE.
# If the file-size would be bigger than this, the index will be created
# through the key cache (which is slower).
myisam_max_sort_file_size = 10G

# If a table has more than one index, MyISAM can use more than one
# thread to repair them by sorting in parallel. This makes sense if you
# have multiple CPUs and plenty of memory.
myisam_repair_threads = 1

# Automatically check and repair not properly closed MyISAM tables.
myisam_recover

# *** INNODB Specific options ***

# Use this option if you have a MySQL server with InnoDB support enabled
# but you do not plan to use it. This will save memory and disk space
# and speed up some things.
#skip-innodb

# Additional memory pool that is used by InnoDB to store metadata
# information. If InnoDB requires more memory for this purpose it will
# start to allocate it from the OS. As this is fast enough on most
# recent operating systems, you normally do not need to change this
# value. SHOW INNODB STATUS will display the current amount used.
innodb_additional_mem_pool_size = 16M

# InnoDB, unlike MyISAM, uses a buffer pool to cache both indexes and
# row data. The bigger you set this the less disk I/O is needed to
# access data in tables. On a dedicated database server you may set this
# parameter up to 80% of the machine physical memory size. Do not set it
# too large, though, because competition of the physical memory may
# cause paging in the operating system. Note that on 32bit systems you
# might be limited to 2-3.5G of user level memory per process, so do not
# set it too high.
innodb_buffer_pool_size = 2G

# InnoDB stores data in one or more data files forming the tablespace.
# If you have a single logical drive for your data, a single
# autoextending file would be good enough. In other cases, a single file
# per device is often a good choice. You can configure InnoDB to use raw
# disk partitions as well – please refer to the manual for more info
# about this.
innodb_data_file_path = ibdata1:10M:autoextend

# Set this option if you would like the InnoDB tablespace files to be
# stored in another location. By default this is the MySQL datadir.
#innodb_data_home_dir = <directory>

# Number of IO threads to use for async IO operations. This value is
# hardcoded to 8 on Unix, but on Windows disk I/O may benefit from a
# larger number.
innodb_write_io_threads = 8
innodb_read_io_threads = 8

# If you run into InnoDB tablespace corruption, setting this to a nonzero
# value will likely help you to dump your tables. Start from value 1 and
# increase it until you’re able to dump the table successfully.
#innodb_force_recovery=1

# Number of threads allowed inside the InnoDB kernel. The optimal value
# depends highly on the application, hardware as well as the OS
# scheduler properties. A too high value may lead to thread thrashing.
innodb_thread_concurrency = 16

# If set to 1, InnoDB will flush (fsync) the transaction logs to the
# disk at each commit, which offers full ACID behavior. If you are
# willing to compromise this safety, and you are running small
# transactions, you may set this to 0 or 2 to reduce disk I/O to the
# logs. Value 0 means that the log is only written to the log file and
# the log file flushed to disk approximately once per second. Value 2
# means the log is written to the log file at each commit, but the log
# file is only flushed to disk approximately once per second.
innodb_flush_log_at_trx_commit = 1

# Speed up InnoDB shutdown. This will disable InnoDB to do a full purge
# and insert buffer merge on shutdown. It may increase shutdown time a
# lot, but InnoDB will have to do it on the next startup instead.
#innodb_fast_shutdown

# The size of the buffer InnoDB uses for buffering log data. As soon as
# it is full, InnoDB will have to flush it to disk. As it is flushed
# once per second anyway, it does not make sense to have it very large
# (even with long transactions).
innodb_log_buffer_size = 8M

# Size of each log file in a log group. You should set the combined size
# of log files to about 25%-100% of your buffer pool size to avoid
# unneeded buffer pool flush activity on log file overwrite. However,
# note that a larger logfile size will increase the time needed for the
# recovery process.
innodb_log_file_size = 256M

# Total number of files in the log group. A value of 2-3 is usually good
# enough.
innodb_log_files_in_group = 3

# Location of the InnoDB log files. Default is the MySQL datadir. You
# may wish to point it to a dedicated hard drive or a RAID1 volume for
# improved performance
#innodb_log_group_home_dir

# Maximum allowed percentage of dirty pages in the InnoDB buffer pool.
# If it is reached, InnoDB will start flushing them out agressively to
# not run out of clean pages at all. This is a soft limit, not
# guaranteed to be held.
innodb_max_dirty_pages_pct = 90

# The flush method InnoDB will use for Log. The tablespace always uses
# doublewrite flush logic. The default value is “fdatasync”, another
# option is “O_DSYNC”.
#innodb_flush_method=O_DSYNC

# How long an InnoDB transaction should wait for a lock to be granted
# before being rolled back. InnoDB automatically detects transaction
# deadlocks in its own lock table and rolls back the transaction. If you
# use the LOCK TABLES command, or other transaction-safe storage engines
# than InnoDB in the same transaction, then a deadlock may arise which
# InnoDB cannot notice. In cases like this the timeout is useful to
# resolve the situation.
innodb_lock_wait_timeout = 120
[mysqldump]
# Do not buffer the whole result set in memory before writing it to
# file. Required for dumping very large tables
quick

max_allowed_packet = 16M

[mysql]
no-auto-rehash

# Only allow UPDATEs and DELETEs that use keys.
#safe-updates

[myisamchk]
key_buffer_size = 512M
sort_buffer_size = 512M
read_buffer = 8M
write_buffer = 8M

[mysqlhotcopy]
interactive-timeout

[mysqld_safe]
# Increase the amount of open files allowed per process. Warning: Make
# sure you have set the global system limit high enough! The high value
# is required for a large number of opened tables
open-files-limit = 8192

mysql主从复制选项和变量

在主服务器和每个从服务器上,必须设置 server_id系统变量以建立唯一的复制ID。对于每个服务器,应选择一个介于1到2 32 − 1之间的唯一正整数,并且每个ID必须与其他任何复制主服务器或从属正在使用的每个ID不同。范例:server-id=3

有关在主服务器上用于控制二进制日志记录的选项。

下表描述了用于控制复制主服务器的启动选项。与复制相关的系统变量将在本节后面讨论。

  • --show-slave-auth-info
    Property Value
    Command-Line Format --show-slave-auth-info[={OFF|ON}]
    Type Boolean
    Default Value OFF

    SHOW SLAVE HOSTS在主服务器上 的输出中,显示以 --report-user和 --report-password选项开头的从站的从站用户名和密码 。

复制主机上使用的系统变量

以下系统变量用于复制原版或由复制原版使用:

  • auto_increment_increment
    Property Value
    Command-Line Format --auto-increment-increment=#
    System Variable auto_increment_increment
    Scope Global, Session
    Dynamic Yes
    SET_VAR Hint Applies Yes
    Type Integer
    Default Value 1
    Minimum Value 1
    Maximum Value 65535

    auto_increment_increment 和auto_increment_offset 用于主机到主复制的使用,并且可以用于控制其操作 AUTO_INCREMENT的列。这两个变量都具有全局值和会话值,并且每个变量都可以采用1到65535(含)之间的整数值。将这两个变量之一的值设置为0会导致其值设置为1。尝试将这两个变量的值设置为大于65535或小于0的整数会导致其值设置为65535。尝试设定auto_increment_increment或 的值 auto_increment_offset 非整数值会产生错误,并且变量的实际值保持不变。

    注意

    auto_increment_increment 还支持与NDB表一起使用 。

    从MySQL 8.0.18开始,设置此系统变量的会话值不再是受限制的操作。

    在服务器上启动组复制时,值 auto_increment_increment更改为的值 group_replication_auto_increment_increment,默认为7,而 auto_increment_offset更改为服务器ID。停止组复制时,将还原更改。仅当auto_increment_increment 且auto_increment_offset 每个更改的默认值均为1时,才进行并还原这些更改 。如果已将其更改为默认值,则组复制不会更改它们。从MySQL 8.0开始,当组复制处于只有一个服务器写入的单主模式下时,系统变量也不会被修改。

    auto_increment_increment 并auto_increment_offset 影响AUTO_INCREMENT列行为,如下所示:

    • auto_increment_increment 控制连续列值之间的间隔。例如:
      mysql> SHOW VARIABLES LIKE 'auto_inc%';
      +--------------------------+-------+
      | Variable_name            | Value |
      +--------------------------+-------+
      | auto_increment_increment | 1     |
      | auto_increment_offset    | 1     |
      +--------------------------+-------+
      2 rows in set (0.00 sec)
      
      mysql> CREATE TABLE autoinc1
          -> (col INT NOT NULL AUTO_INCREMENT PRIMARY KEY);
        Query OK, 0 rows affected (0.04 sec)
      
      mysql> SET @@auto_increment_increment=10;
      Query OK, 0 rows affected (0.00 sec)
      
      mysql> SHOW VARIABLES LIKE 'auto_inc%';
      +--------------------------+-------+
      | Variable_name            | Value |
      +--------------------------+-------+
      | auto_increment_increment | 10    |
      | auto_increment_offset    | 1     |
      +--------------------------+-------+
      2 rows in set (0.01 sec)
      
      mysql> INSERT INTO autoinc1 VALUES (NULL), (NULL), (NULL), (NULL);
      Query OK, 4 rows affected (0.00 sec)
      Records: 4  Duplicates: 0  Warnings: 0
      
      mysql> SELECT col FROM autoinc1;
      +-----+
      | col |
      +-----+
      |   1 |
      |  11 |
      |  21 |
      |  31 |
      +-----+
      4 rows in set (0.00 sec)
    • auto_increment_offset 确定AUTO_INCREMENT列值的起点 。考虑以下条件,假设这些语句与描述中给出的示例在同一会话中执行 auto_increment_increment
      mysql> SET @@auto_increment_offset=5;
      Query OK, 0 rows affected (0.00 sec)
      
      mysql> SHOW VARIABLES LIKE 'auto_inc%';
      +--------------------------+-------+
      | Variable_name            | Value |
      +--------------------------+-------+
      | auto_increment_increment | 10    |
      | auto_increment_offset    | 5     |
      +--------------------------+-------+
      2 rows in set (0.00 sec)
      
      mysql> CREATE TABLE autoinc2
          -> (col INT NOT NULL AUTO_INCREMENT PRIMARY KEY);
      Query OK, 0 rows affected (0.06 sec)
      
      mysql> INSERT INTO autoinc2 VALUES (NULL), (NULL), (NULL), (NULL);
      Query OK, 4 rows affected (0.00 sec)
      Records: 4  Duplicates: 0  Warnings: 0
      
      mysql> SELECT col FROM autoinc2;
      +-----+
      | col |
      +-----+
      |   5 |
      |  15 |
      |  25 |
      |  35 |
      +-----+
      4 rows in set (0.02 sec)

      当的值 auto_increment_offset 大于 auto_increment_increment的值时,auto_increment_offset 将忽略的值 。

    如果更改了这些变量中的任何一个,然后将新行插入到包含AUTO_INCREMENT列的表中 ,则结果似乎违反直觉,因为AUTO_INCREMENT计算该系列 值时不考虑该列中已经存在的任何值,并且下一个插入的值是该系列中的最小值大于该AUTO_INCREMENT列中的最大现有值 。该序列的计算如下:

    auto_increment_offsetN× auto_increment_increment

    其中,N是[1、2、3,…]系列中的正整数值。例如:

    mysql> SHOW VARIABLES LIKE 'auto_inc%';
    +--------------------------+-------+
    | Variable_name            | Value |
    +--------------------------+-------+
    | auto_increment_increment | 10    |
    | auto_increment_offset    | 5     |
    +--------------------------+-------+
    2 rows in set (0.00 sec)
    
    mysql> SELECT col FROM autoinc1;
    +-----+
    | col |
    +-----+
    |   1 |
    |  11 |
    |  21 |
    |  31 |
    +-----+
    4 rows in set (0.00 sec)
    
    mysql> INSERT INTO autoinc1 VALUES (NULL), (NULL), (NULL), (NULL);
    Query OK, 4 rows affected (0.00 sec)
    Records: 4  Duplicates: 0  Warnings: 0
    
    mysql> SELECT col FROM autoinc1;
    +-----+
    | col |
    +-----+
    |   1 |
    |  11 |
    |  21 |
    |  31 |
    |  35 |
    |  45 |
    |  55 |
    |  65 |
    +-----+
    8 rows in set (0.00 sec)

    显示auto_increment_increment 并auto_increment_offset 生成5 + N×10 系列的值 ,即[5、15、25、35、45,…]。出现在col之前的列 中的最大值INSERT是31,而该AUTO_INCREMENT 序列中的下一个可用值是35,因此col从该点开始的插入值 和结果如SELECT 查询所示。

    不可能将这两个变量的作用限制在一个表中。这些变量控制MySQL服务器上所有中所有AUTO_INCREMENT列 的行为。如果设置了其中一个变量的全局值,则其影响将持续到通过设置会话值更改或覆盖全局值,或者直到重新启动mysqld为止。如果设置了本地值,则新值将影响 会话期间当前用户在其中插入新行的所有表的列,除非在该会话期间更改了值。 AUTO_INCREMENT

    默认值为 auto_increment_increment1。请参见 mysql第17.5.1.1节“复制和AUTO_INCREMENT”

  • auto_increment_offset
    Property Value
    Command-Line Format --auto-increment-offset=#
    System Variable auto_increment_offset
    Scope Global, Session
    Dynamic Yes
    SET_VAR Hint Applies Yes
    Type Integer
    Default Value 1
    Minimum Value 1
    Maximum Value 65535

    此变量的默认值为1。如果保留其默认值,并且在多主模式下在服务器上启动组复制,则会将其更改为服务器ID。有关更多信息,请参见的描述 auto_increment_increment

    注意

    auto_increment_offset还支持与NDB表一起使用。

    从MySQL 8.0.18开始,设置此系统变量的会话值不再是受限制的操作。

  • immediate_server_version
    Property Value
    Introduced 8.0.14
    System Variable immediate_server_version
    Scope Session
    Dynamic Yes
    SET_VAR Hint Applies No
    Type Integer

    供复制内部使用。该会话系统变量保存服务器的MySQL服务器发行版号,该服务器是复制拓扑中的直接主服务器(例如,80014对于MySQL 8.0.14服务器实例)。如果此即时服务器的发行版不支持会话系统变量,则该变量的值将设置为0(UNKNOWN_SERVER_VERSION)。

    变量的值从主机复制到从机。通过识别这些信息,从属服务器可以通过识别所涉及的版本之间在何处发生语法更改或语义更改并进行适当的处​​理,来正确处理来自较旧版本的主服务器的数据。该信息还可以在组复制环境中使用,在该环境中,复制组的一个或多个成员的版本比其他成员的版本高。可以在每个交易的二进制日志中查看变量的值(作为 Gtid_log_event,或 Anonymous_gtid_log_event (如果服务器上未使用GTID),则可能有助于调试跨版本复制问题。

    设置此系统变量的会话值是受限制的操作。会话用户必须具有 REPLICATION_APPLIER特权(请参见第17.3.3节“复制特权检查”)或足以设置受限制的会话变量的特权(请参见第5.1.9.1节“系统变量特权”)。但是,请注意,该变量并非供用户设置。它是由复制基础结构自动设置的。

  • original_server_version
    Property Value
    Introduced 8.0.14
    System Variable original_server_version
    Scope Session
    Dynamic Yes
    SET_VAR Hint Applies No
    Type Integer

    供复制内部使用。此会话系统变量保存最初提交事务的服务器的MySQL Server版本号(例如, 80014对于MySQL 8.0.14服务器实例)。如果此原始服务器的发行版不支持会话系统变量,则该变量的值将设置为0(UNKNOWN_SERVER_VERSION)。请注意,当原始服务器设置发行版号时,如果复制拓扑中的直接服务器或任何其他中介服务器不支持会话系统变量,那么该变量的值将重置为0,因此不复制其值。

    变量的值的设置和使用方式与 immediate_server_version 系统变量相同。如果该变量的值与immediate_server_version 系统变量的值相同 ,则仅将后者记录在二进制日志中,并指示原始服务器版本是相同的。

    在组复制环境中,查看更改日志事件(这些事件是新成员加入组时每个组成员排队的特殊事务)用组成员的服务器版本对事务进行标记。这样可确保加入成员知道原始供体的服务器版本。因为排队等待特定视图更改的视图更改日志事件在所有成员上都具有相同的GTID,所以仅在这种情况下,同一GTID的实例可能具有不同的原始服务器版本。

    设置此系统变量的会话值是受限制的操作。会话用户必须具有 REPLICATION_APPLIER特权(请参见第17.3.3节“复制特权检查”)或足以设置受限制的会话变量的特权(请参见第5.1.9.1节“系统变量特权”)。但是,请注意,该变量并非供用户设置。它是由复制基础结构自动设置的。

  • rpl_semi_sync_master_enabled
    Property Value
    Command-Line Format --rpl-semi-sync-master-enabled[={OFF|ON}]
    System Variable rpl_semi_sync_master_enabled
    Scope Global
    Dynamic Yes
    SET_VAR Hint Applies No
    Type Boolean
    Default Value OFF

    控制是否在主服务器上启用半同步复制。要启用或禁用插件,请将此变量 分别设置为ONOFF(或1或0)。默认值为 OFF

    仅当安装了主端半同步复制插件时,此变量才可用。

  • rpl_semi_sync_master_timeout
    Property Value
    Command-Line Format --rpl-semi-sync-master-timeout=#
    System Variable rpl_semi_sync_master_timeout
    Scope Global
    Dynamic Yes
    SET_VAR Hint Applies No
    Type Integer
    Default Value 10000

    以毫秒为单位的值,用于控制主机在超时并恢复为异步复制之前,等待提交等待从属服务器进行确认的时间。默认值为10000(10秒)。

    仅当安装了主端半同步复制插件时,此变量才可用。

  • rpl_semi_sync_master_trace_level
    Property Value
    Command-Line Format --rpl-semi-sync-master-trace-level=#
    System Variable rpl_semi_sync_master_trace_level
    Scope Global
    Dynamic Yes
    SET_VAR Hint Applies No
    Type Integer
    Default Value 32

    主服务器上的半同步复制调试跟踪级别。定义了四个级别:

    • 1 =常规级别(例如,时间功能故障)
    • 16 =详细程度(更多详细信息)
    • 32 =净等待级别(有关网络等待的更多信息)
    • 64 =功能级别(有关功能进入和退出的信息)

    仅当安装了主端半同步复制插件时,此变量才可用。

  • rpl_semi_sync_master_wait_for_slave_count
    Property Value
    Command-Line Format --rpl-semi-sync-master-wait-for-slave-count=#
    System Variable rpl_semi_sync_master_wait_for_slave_count
    Scope Global
    Dynamic Yes
    SET_VAR Hint Applies No
    Type Integer
    Default Value 1
    Minimum Value 1
    Maximum Value 65535

    主机在继续之前必须为每个事务接收的从机确认数。默认情况下 rpl_semi_sync_master_wait_for_slave_count 为1,表示半同步复制在收到单个从属确认后继续进行。对于此变量的较小值,性能最佳。

    例如,如果 rpl_semi_sync_master_wait_for_slave_count is为2,则2个从属必须在rpl_semi_sync_master_timeout 半同步复制配置的超时时间继续之前确认事务的接收 。如果在超时期间较少的从服务器确认接收到事务,则主服务器将恢复为正常复制。

    注意

    此行为还取决于 rpl_semi_sync_master_wait_no_slave

    仅当安装了主端半同步复制插件时,此变量才可用。

  • rpl_semi_sync_master_wait_no_slave
    Property Value
    Command-Line Format --rpl-semi-sync-master-wait-no-slave[={OFF|ON}]
    System Variable rpl_semi_sync_master_wait_no_slave
    Scope Global
    Dynamic Yes
    SET_VAR Hint Applies No
    Type Boolean
    Default Value ON

    控制主服务器是否等待由配置的超时时间rpl_semi_sync_master_timeout 到期,即使从服务器的计数下降到小于超时期间配置 的从服务器的数量也是如此 rpl_semi_sync_master_wait_for_slave_count 。

    当的值 rpl_semi_sync_master_wait_no_slave是 ON(默认值),则允许用于从属计数下降到小于 rpl_semi_sync_master_wait_for_slave_count 在超时期限内。只要有足够多的从服务器在超时期限到期之前确认该事务,半同步复制就会继续。

    当的值 rpl_semi_sync_master_wait_no_slave是 OFF,如果从计数降到比配置数量较少 rpl_semi_sync_master_wait_for_slave_count 期间由配置的超时时间段在任何时候 rpl_semi_sync_master_timeout,主回复到正常的复制。

    仅当安装了主端半同步复制插件时,此变量才可用。

  • rpl_semi_sync_master_wait_point
    Property Value
    Command-Line Format --rpl-semi-sync-master-wait-point=value
    System Variable rpl_semi_sync_master_wait_point
    Scope Global
    Dynamic Yes
    SET_VAR Hint Applies No
    Type Enumeration
    Default Value AFTER_SYNC
    Valid Values

    AFTER_SYNC

    AFTER_COMMIT

    此变量控制半同步复制主服务器在将状态返回给提交事务的客户端之前等待事务接收的从属确认的时间点。这些值是允许的:

    • AFTER_SYNC(默认):主服务器将每个事务写入其二进制日志,而从服务器则将二进制日志同步到磁盘。主机在同步后等待从机对交易收据的确认。收到确认后,主服务器将事务提交到存储引擎,并将结果返回给客户端,然后客户端可以继续进行。
    • AFTER_COMMIT:主服务器将每个事务写入其二进制日志,而从服务器将其同步到二进制日志,然后将事务提交到存储引擎。提交后,主机等待从机对交易收据的确认。收到确认后,主机将结果返回给客户端,然后客户端可以继续进行。

    这些设置的复制特征如下:

    • 使用AFTER_SYNC,所有客户端可以同时看到已提交的事务:从属服务器确认了该事务并提交给了主服务器上的存储引擎之后。因此,所有客户端都可以在主服务器上看到相同的数据。如果主服务器发生故障,则所有在主服务器上提交的事务都将复制到从服务器(保存到其中继日志中)。由于从属服务器是最新的,因此主服务器崩溃和故障转移到从属服务器是无损的。但是请注意,在这种情况下无法重新启动主服务器,必须将其丢弃,因为其二进制日志中可能包含未提交的事务,这些事务在二进制日志恢复后被外部化时会与从服务器发生冲突。
    • 使用AFTER_COMMIT,仅在服务器提交到存储引擎并接收到从属确认后,发出事务的客户端才会获得返回状态。在提交之后和从属确认之前,其他客户端可以在提交客户端之前看到提交的事务。如果出现故障,导致从服务器无法处理事务,则在主服务器崩溃并故障转移到从服务器的情况下,此类客户端可能会看到相对于其在主服务器上看到的数据丢失的情况。

    仅当安装了主端半同步复制插件时,此变量才可用。

    由于增加了 rpl_semi_sync_master_wait_point 在MySQL 5.7,创建一个版本的兼容性约束,因为它增加了半同步接口版本:服务器为MySQL 5.7和更高不要从旧版本的半同步复制插件的工作,也没有从旧版本的服务器与半同步复制插件工作适用于MySQL 5.7和更高版本。

原文:https://dev.mysql.com/doc/refman/8.0/en/replication-options-master.html

mysql执行delete大数据时建议的方法

一张表可以存10几亿条的数据,特别是硬件上报的日志,特别多,而且还很多没有什么用的,某些数据库(本人试验mysql5.1)在批量删除数据时会拖慢数据库,本来跟删除的表无关,但还是拖慢了,也许是服务器的问题。

建议的方式:

  1. 创建一张备份表
  2. 如果删除的数据大于存留的数据,那么将存留的数据拷贝到备份表去
  3. 使用TRUNCATE TABLE命令,直接清空原表的数据
  4. 将备份表的数据拷贝到原表中
  5. 使用TRUNCATE TABLE命令清空备份表的数据

CREATE TABLE tb_device_report_log_bak SELECT * FROM tb_device_report_log_2 WHERE 1;
INSERT INTO tb_device_report_log_bak SELECT * FROM tb_device_report_log_2 a WHERE a.msgId!=10009;
TRUNCATE tb_device_report_log_2;
SELECT count(1) as zs ,msgId FROM `tb_device_report_log_2` WHERE 1 group by msgId order by zs desc;
INSERT INTO tb_device_report_log_2 SELECT * FROM tb_device_report_log_bak a WHERE 1;
TRUNCATE tb_device_report_log_bak;

SELECT count(1) as zs ,msgId FROM `tb_device_report_log_2` WHERE 1 group by msgId order by zs desc;

这行命令我是用来对比数据的,ok了再TRUNCATE表。


mysql utf8_unicode_ci与utf8_general_ci的区别

utf8_unicode_ci和utf8_general_ci对中、英文来说没有实质的差别。
utf8_general_ci 校对速度快,但准确度稍差。
utf8_unicode_ci 准确度高,但校对速度稍慢。

如果你的应用有德语、法语或者俄语,请一定使用utf8_unicode_ci。一般用utf8_general_ci就够了。
附:

ci是 case insensitive, 即 “大小写不敏感”, a 和 A 会在字符判断中会被当做一样的;
bin 是二进制, a 和 A 会别区别对待。

例如你运行:
SELECT * FROM table WHERE txt = ‘a’
那么在utf8_bin中你就找不到 txt = ‘A’ 的那一行, 而 utf8_general_ci 则可以。

utf8_general_ci 不区分大小写,这个你在注册用户名和邮箱的时候就要使用。
utf8_general_cs 区分大小写,如果用户名和邮箱用这个 就会照成不良后果
utf8_bin:字符串每个字符串用二进制数据编译存储。 区分大小写,而且可以存二进制的内容

MySQL索引和查询优化

索引相关

索引基数

基数是数据列所包含的不同值的数量,例如,某个数据列包含值 1、3、7、4、7、3,那么它的基数就是 4。

索引的基数相对于数据表行数较高(也就是说,列中包含很多不同的值,重复的值很少)的时候,它的工作效果最好。

如果某数据列含有很多不同的年龄,索引会很快地分辨数据行;如果某个数据列用于记录性别(只有“M”和“F”两种值),那么索引的用处就不大;如果值出现的几率几乎相等,那么无论搜索哪个值都可能得到一半的数据行。

在这些情况下,最好根本不要使用索引,因为查询优化器发现某个值出现在表的数据行中的百分比很高的时候,它一般会忽略索引,进行全表扫描。惯用的百分比界线是“30%”。

索引失效原因

索引失效的原因有如下几点:

  • 对索引列运算,运算包括(+、-、*、/、!、<>、%、like’%_'(% 放在前面)。
  • 类型错误,如字段类型为 varchar,where 条件用 number。
  • 对索引应用内部函数,这种情况下应该要建立基于函数的索引。例如 select * from template t where ROUND (t.logicdb_id) = 1,此时应该建 ROUND (t.logicdb_id) 为索引。

MySQL 8.0 开始支持函数索引,5.7 可以通过虚拟列的方式来支持,之前只能新建一个 ROUND (t.logicdb_id) 列然后去维护。

  • 如果条件有 or,即使其中有条件带索引也不会使用(这也是为什么建议少使用 or 的原因),如果想使用 or,又想索引有效,只能将 or 条件中的每个列加上索引。
  • 如果列类型是字符串,那一定要在条件中数据使用引号,否则不使用索引。
  • B-tree 索引 is null 不会走,is not null 会走,位图索引 is null,is not null 都会走。
  • 组合索引遵循最左原则。

索引的建立

索引的建立需要注意以下几点:

  • 最重要的肯定是根据业务经常查询的语句。
  • 尽量选择区分度高的列作为索引,区分度的公式是 COUNT(DISTINCT col) / COUNT(*),表示字段不重复的比率,比率越大我们扫描的记录数就越少。
  • 如果业务中唯一特性最好建立唯一键,一方面可以保证数据的正确性,另一方面索引的效率能大大提高。

EXPLIAN 中有用的信息

基本用法

EXPLIAN 基本用法如下:

  • desc 或者 explain 加上你的 SQL。
  • extended explain 加上你的 SQL,然后通过 show warnings 可以查看实际执行的语句,这一点也是非常有用的,很多时候不同的写法经 SQL 分析后,实际执行的代码是一样的。

提高性能的特性

EXPLIAN 提高性能的特性如下:

  • 索引覆盖(covering index):需要查询的数据在索引上都可以查到不需要回表 EXTRA 列显示 using index。
  • ICP特性(Index Condition Pushdown):本来 index 仅仅是 data access 的一种访问模式,存数引擎通过索引回表获取的数据会传递到 MySQL Server 层进行 where 条件过滤。

5.6 版本开始当 ICP 打开时,如果部分 where 条件能使用索引的字段,MySQL Server 会把这部分下推到引擎层,可以利用 index 过滤的 where 条件在存储引擎层进行数据过滤。

EXTRA 显示 using index condition。需要了解 MySQL 的架构图分为 Server 和存储引擎层。

  • 索引合并(index merge):对多个索引分别进行条件扫描,然后将它们各自的结果进行合并(intersect/union)。

一般用 or 会用到,如果是 AND 条件,考虑建立复合索引。EXPLAIN 显示的索引类型会显示 index_merge,EXTRA 会显示具体的合并算法和用到的索引。

Extra 字段

Extra 字段使用:

  • using filesort:说明 MySQL 会对数据使用一个外部的索引排序,而不是按照表内的索引顺序进行读取。

MySQL 中无法利用索引完成的排序操作称为“文件排序”,其实不一定是文件排序,内部使用的是快排。

  • using temporary:使用了临时表保存中间结果,MySQL 在对查询结果排序时使用临时表。常见于排序 order by 和分组查询 group by。
  • using index:表示相应的 SELECT 操作中使用了覆盖索引(Covering Index),避免访问了表的数据行,效率不错。
  • impossible where:where 子句的值总是 false,不能用来获取任何元组。
  • select tables optimized away:在没有 group by 子句的情况下基于索引优化 MIN/MAX 操作或者对于 MyISAM 存储引擎优化 COUNT(*) 操作,不必等到执行阶段再进行计算,查询执行计划生成的阶段即完成优化。
  • distinct:优化 distinct 操作,在找到第一匹配的元组后即停止找同样值的操作。

using filesort、using temporary 这两项出现时需要注意下,这两项是十分耗费性能的。

在使用 group by 的时候,虽然没有使用 order by,如果没有索引,是可能同时出现 using filesort,using temporary 的。

因为 group by 就是先排序在分组,如果没有排序的需要,可以加上一个 order by NULL 来避免排序,这样 using filesort 就会去除,能提升一点性能。

type 字段

type 字段使用:

  • system:表只有一行记录(等于系统表),这是 const 类型的特例,平时不会出现。
  • const:如果通过索引依次就找到了,const 用于比较主键索引或者 unique 索引。因为只能匹配一行数据,所以很快。如果将主键置于 where 列表中,MySQL 就能将该查询转换为一个常量。
  • eq_ref:唯一性索引扫描,对于每个索引键,表中只有一条记录与之匹配。常见于主键或唯一索引扫描。
  • ref:非唯一性索引扫描,返回匹配某个单独值的所有行。本质上也是一种索引访问,它返回所有匹配某个单独值的行,然而它可能会找到多个符合条件的行,所以它应该属于查找和扫描的混合体。
  • range:只检索给定范围的行,使用一个索引来选择行。key 列显示使用了哪个索引,一般就是在你的 where 语句中出现 between、<、>、in 等的查询。
  • 这种范围扫描索引比全表扫描要好,因为只需要开始于缩印的某一点,而结束于另一点,不用扫描全部索引。
  • index:Full Index Scan ,index 与 ALL 的区别为 index 类型只遍历索引树,这通常比 ALL 快,因为索引文件通常比数据文件小。
  • 也就是说虽然 ALL 和 index 都是读全表,但 index 是从索引中读取的,而 ALL 是从硬盘读取的。
  • all:Full Table Scan,遍历全表获得匹配的行。

字段类型和编码

MySQL 返回字符串长度

CHARACTER_LENGTH(同CHAR_LENGTH)方法返回的是字符数,LENGTH 函数返回的是字节数,一个汉字三个字节。

varchar 等字段建立索引长度计算语句

select count(distinct left(test,5))/count(*) from table;越趋近 1 越好。

MySQL 的 utf8

MySQL 的 utf8 最大是 3 个字节不支持 emoji 表情符号,必须只用 utf8mb4。需要在 MySQL 配置文件中配置客户端字符集为 utf8mb4。

JDBC 的连接串不支持配置 characterEncoding=utf8mb4,最好的办法是在连接池中指定初始化 SQL。

例如:hikari 连接池,其他连接池类似 spring . datasource . hikari . connection – init – sql =set names utf8mb4。否则需要每次执行 SQL 前都先执行 set names utf8mb4。

MySQL 排序规则

一般使用 _bin 和 _genera_ci:

  • utf8_genera_ci 不区分大小写,ci 为 case insensitive 的缩写,即大小写不敏感。
  • utf8_general_cs 区分大小写,cs 为 case sensitive 的缩写,即大小写敏感,但是目前 MySQL 版本中已经不支持类似于 ***_genera_cs 的排序规则,直接使用 utf8_bin 替代。
  • utf8_bin 将字符串中的每一个字符用二进制数据存储,区分大小写。

那么,同样是区分大小写,utf8_general_cs 和 utf8_bin 有什么区别?

  • cs 为 case sensitive 的缩写,即大小写敏感;bin 的意思是二进制,也就是二进制编码比较。
  • utf8_general_cs 排序规则下,即便是区分了大小写,但是某些西欧的字符和拉丁字符是不区分的,比如 ä=a,但是有时并不需要 ä=a,所以才有 utf8_bin。
  • utf8_bin 的特点在于使用字符的二进制的编码进行运算,任何不同的二进制编码都是不同的,因此在 utf8_bin 排序规则下:ä<>a。

初始化命令

SQLyog 中初始连接指定编码类型使用连接配置的初始化命令,如下图:

1553049871-8082-f30aeb6b3a7c26fdbd2e48f6ecf3

SQL 语句总结

常用但容易忘的

SQL 语句常用但容易忘的总结如下:

  • 如果有主键或者唯一键冲突则不插入:insert ignore into。
  • 如果有主键或者唯一键冲突则更新,注意这个会影响自增的增量:INSERT INTO room_remarks(room_id,room_remarks)VALUE(1,”sdf”) ON DUPLICATE KEY UPDATE room_remarks = “234”。
  • 如果有就用新的替代,values 如果不包含自增列,自增列的值会变化:REPLACE INTO room_remarks(room_id,room_remarks) VALUE(1,”sdf”)。
  • 备份表:CREATE TABLE user_info SELECT * FROM user_info。
  • 复制表结构:CREATE TABLE user_v2 LIKE user。
  • 从查询语句中导入:INSERT INTO user_v2 SELECT * FROM user 或者 INSERT INTO user_v2(id,num) SELECT id,num FROM user。
  • 连表更新:UPDATE user a, room b SET a.num=a.num+1 WHERE a.room_id=b.id。
  • 连表删除:DELETE user FROM user,black WHERE user.id=black.id。

锁相关

锁相关(作为了解,很少用):

  • 共享锁:select id from tb_test where id = 1 lock in share mode。
  • 排它锁:select id from tb_test where id = 1 for update。

优化时用到

优化时用到:

  • 强制使用某个索引:select * from table force index(idx_user) limit 2。
  • 禁止使用某个索引:select * from table ignore index(idx_user) limit 2。
  • 禁用缓存(在测试时去除缓存的影响):select SQL_NO_CACHE from table limit 2。

查看状态

查看状态:

  • 查看字符集:SHOW VARIABLES LIKE ‘character_set%’。
  • 查看排序规则:SHOW VARIABLES LIKE ‘collation%’。

SQL 编写注意

SQL 编写请注意:

  • where 语句的解析顺序是从右到左,条件尽量放 where 不要放 having。
  • 采用延迟关联(deferred join)技术优化超多分页场景,比如 limit 10000,10,延迟关联可以避免回表。
  • distinct 语句非常损耗性能,可以通过 group by 来优化。
  • 连表尽量不要超过三个表。

踩坑

踩坑总结如下:

  • 如果有自增列,truncate 语句会把自增列的基数重置为 0,有些场景用自增列作为业务上的 ID 需要十分重视。
  • 聚合函数会自动滤空,比如 a 列的类型是 int 且全部是 NULL,则 SUM(a) 返回的是 NULL 而不是 0。
  • MySQL 判断 null 相等不能用 “a=null”,这个结果永远为 UnKnown,where 和 having 中,UnKnown 永远被视为 false,check 约束中,UnKnown 就会视为 true 来处理。所以要用“a is null”处理。

千万大表在线修改

MySQL 在表数据量很大的时候,如果修改表结构会导致锁表,业务请求被阻塞。

MySQL 在 5.6 之后引入了在线更新,但是在某些情况下还是会锁表,所以一般都采用 PT 工具( Percona Toolkit)。

如对表添加索引:

  1. pt-online-schema-change –user=’root’ –host=’localhost’ –ask-pass –alter “add index idx_user_id(room_id,create_time)” 
  2. D=fission_show_room_v2,t=room_favorite_info –execute

慢查询日志

有时候如果线上请求超时,应该去关注下慢查询日志,慢查询的分析很简单,先找到慢查询日志文件的位置,然后利用 mysqldumpslow 去分析。

查询慢查询日志信息可以直接通过执行 SQL 命令查看相关变量,常用的 SQL 如下:

1553049871-4435-7eca532cafc585df2df3f6950d99

mysqldumpslow 的工具十分简单,我主要用到的参数如下:

  • -t:限制输出的行数,我一般取前十条就够了。
  • -s:根据什么来排序默认是平均查询时间 at,我还经常用到 c 查询次数,因为查询次数很频繁但是时间不高也是有必要优化的,还有 t 查询时间,查看那个语句特别卡。
  • -v:输出详细信息。

例子:mysqldumpslow -v -s t -t 10 mysql_slow.log.2018-11-20-0500。

查看 SQL 进程和杀死进程

如果你执行了一个 SQL 的操作,但是迟迟没有返回,你可以通过查询进程列表看看它的实际执行状况。

如果该 SQL 十分耗时,为了避免影响线上可以用 kill 命令杀死进程,通过查看进程列表也能直观的看下当前 SQL 的执行状态;如果当前数据库负载很高,在进程列表可能会出现,大量的进程夯住,执行时间很长。

命令如下:

  1. –查看进程列表
  2. SHOW PROCESSLIST;
  3. –杀死某个进程
  4. kill 183665

如果你使用的 SQLyog,那么也有图形化的页面,在菜单栏→工具→显示→进程列表。

在进程列表页面可以右键杀死进程,如下所示:

1553049871-4118-e1f8c1f08376a8c359dbe4873f72

1553049871-5239-a0a6.jpg-wh-600x-s-902309858

一些数据库性能的思考

在对公司慢查询日志做优化的时候,很多时候可能是忘了建索引,像这种问题很容易解决,加个索引就行了。但是有几种情况就不是简单加索引能解决了:

业务代码循环读数据库

考虑这样一个场景,获取用户粉丝列表信息,加入分页是十个,其实像这样的 SQL 是十分简单的,通过连表查询性能也很高。

但是有时候,很多开发采用了取出一串 ID,然后循环读每个 ID 的信息,这样如果 ID 很多对数据库的压力是很大的,而且性能也很低。

统计 SQL

很多时候,业务上都会有排行榜这种,发现公司有很多地方直接采用数据库做计算,在对一些大表做聚合运算的时候,经常超过五秒,这些 SQL 一般很长而且很难优化。

像这种场景,如果业务允许(比如一致性要求不高或者是隔一段时间才统计的),可以专门在从库里面做统计。另外我建议还是采用 Redis 缓存来处理这种业务。

超大分页

在慢查询日志中发现了一些超大分页的慢查询如 Limit 40000,1000,因为 MySQL 的分页是在 Server 层做的,可以采用延迟关联在减少回表。

但是看了相关的业务代码正常的业务逻辑是不会出现这样的请求的,所以很有可能是有恶意用户在刷接口,最好在开发的时候也对接口加上校验拦截这些恶意请求。

123410
 
Copyright © 2008-2021 lanxinbase.com Rights Reserved. | 粤ICP备14086738号-3 |