一、资源管理
Java 有 try-finally,可以在 finally 中进行资源的关闭;Go 可以使用 defer
- defer 在函数结束时发生调用
- defer 的调用是栈类型 – 先进后出
- defer 通常用于资源关闭 Open/Close,Lock/UnLock 等
一句话总结:defer 的调用机制是 “将defer语句加入栈中,当函数结束时(包括正常执行结束 / return / panic 出错结束等),从栈中依次执行 defer”
func writeFile(filename string) {
   file, err := os.Create(filename)
   if err != nil {
      panic(err)
   }
   defer file.Close() // 将 "file.Close()" 压入 defer 栈中

   writer := bufio.NewWriter(file)
   defer writer.Flush() // 将 "writer.Flush()" 压入 defer 栈中

   fmt.Fprintln(writer, "123")
   // 当函数执行结束时,从 defer 栈中执行语句 - 后进先出,先 "writer.Flush()",再 "file.Close()"
}

func main() {
   writeFile("defer.txt")
}
二、错误简单处理
使用机制
通过被调用函数的注释查看其可能发生的错误,然后依据错误类型并进行处理;
错误处理结束后要 return
func main() {
   file, err := os.Open(filename)
   // 错误处理
   if err != nil {
      // 判断 err 是否是 *os.PathError,因为 os.Open(filename) 的注释:"If there is an error, it will be of type *PathError."
      if pathError, ok := err.(*os.PathError); ok {
         fmt.Printf("error: %s", pathError.Error())
      } else {
         fmt.Printf("notKnown error:%s", err.Error())
      }
      return // 返回
   }
}

//error 是一个接口,定义如下:

// The error built-in interface type is the conventional interface for
// representing an error condition, with the nil value representing no error.
type error interface {
   Error() string
}
基于该接口我们可以实现自定义的 error 实现。( errors 是 error 接口的一个实现,可以直接仿照,也可以直接使用,如 err := errors.New(“my custom error”))
三、panic & recover
- panic
- 停止当前程序运行
- 一直向上返回,执行每一层的 defer
- 如果没有遇见 recover,程序退出
- recover(相当于对 panic 的 catch 语句)
- 仅在 defer 调用中使用
- 获取 panic 的值
- 如果无法处理,可重新 panic
import (
   "fmt"
   "errors"
)

func recove() {
   defer func() {
      // func recover() interface{},表示 recover() 函数的返回类型可以是各种类型,所以要判断是否是 error
      // 使用 recover() catch panic,防止程序直接退出
      r := recover()
      if err, ok := r.(error); ok {
         fmt.Println(err) // runtime error: integer divide by zero
      } else {
         panic(errors.New("not known error"))
      }
   }()

   b := 0
   a := 5/b // panic: runtime error: integer divide by zero
   fmt.Println(a)

   //panic("123") // panic: not known error
}

func main() {
   recove()
}
四、错误统一处理
一个生产系统通常包含两种异常
- 不可直接暴露给用户的异常:例如系统内部异常
- 需要暴露给用户的异常:例如部分自定义异常信息用于提示用户操作
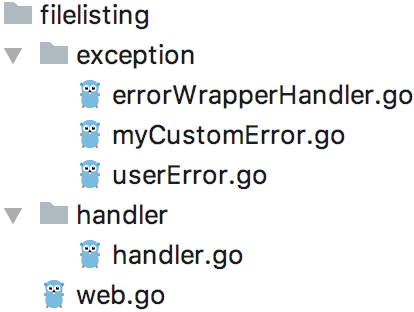
本节写一个需求:实现一个读取文件的 httpServer 处理器。
代码结构如下:
4.1 userError 自定义用户异常接口
package exception

type UserError interface {
   error // 内嵌类型
   Message() string
}
4.2 myCustomError 自定义用户异常实现
package exception

// 基于基本类型创建自定义类型
type MyCustomError string

func (e MyCustomError) Error() string {
   return e.Message()
}

func (e MyCustomError) Message() string {
   return string(e)
}
4.3 handler 核心业务逻辑处理器
package handler

import (
"net/http"
"os"
"io/ioutil"
"strings"
"exception"
)

const PathPrefix = "/list/"

// 实现一个读取文件的 httpServer 处理器
// 假设访问 http://localhost:8888/list/abc.txt
func HandleFileListing(writer http.ResponseWriter, request *http.Request) error {
   // 1. 如果 urlPath 不是以 /list/ 开头的,则自定义用户错误
   if strings.Index(request.URL.Path, PathPrefix) != 0 {
      return exception.MyCustomError("url path need startWith /list/")
   }
   //fmt.Println("path", request.URL.Path)    // /list/abc.txt
   path := request.URL.Path[len(PathPrefix):] // abc.txt 字符串切割,subString

   // 2. 打开文件
   file, err := os.Open(path)
   if err != nil {
      // 遇到错误直接返回,由错误统一处理器进行处理
      return err
   }
   defer file.Close()

   // 3. 读取文件到 byte[]
   all, err := ioutil.ReadAll(file)
   if err != nil {
      return err
   }

   // 4. 将 byte[] all 写出到响应流
   writer.Write(all)
   return nil
}
4.4 errorWrapperHandler 统一错误处理器
package exception

import (
"net/http"
"log"
"os"
)

// 定义一个 function 类型的 type,返回值是 error
type appHandler func(writer http.ResponseWriter, request *http.Request) error

// 输入 appHandler 是一个函数,输出也是一个函数 - 函数式编程
func ErrWrapper(handler appHandler) func(http.ResponseWriter, *http.Request) {
   return func(writer http.ResponseWriter, request *http.Request) {
      // 1. 处理业务逻辑
      err := handler(writer, request)
      if err != nil {
         log.Printf("error occured, %s", err) // 2018/11/04 10:10:12 error occured, open abc.txt1: no such file or directory

         // 2. 处理可以抛给用户的错误
         if err, ok := err.(UserError); ok {
            // 将错误写回到 http.ResponseWriter
            http.Error(writer, err.Message(), http.StatusBadRequest)
         }

         // 3. 处理不可以抛给用户的错误
         code := http.StatusOK
         switch {
         case os.IsNotExist(err):
            code = http.StatusNotFound
         default:
            code = http.StatusInternalServerError
         }
         http.Error(writer, http.StatusText(code), code) // 浏览器:Not Found
      }
   }
}
注意这样的姿势:定义一个 function 类型的 type,返回值是 error
type appHandler func(xx) error
4.5 web httpServer 服务器
package main

import (
"net/http"
"handler"
"exception"
)

func main() {
   // 1. 注册处理 handler.PathPrefix 开头的业务逻辑处理器
   http.HandleFunc(handler.PathPrefix, exception.ErrWrapper(handler.HandleFileListing))

   // 2. 启动 httpServer,监听端口
   err := http.ListenAndServe("127.0.0.1:8888", nil)

   // 3. 如果启动失败,则直接抛出错误
   if err != nil {
      panic(err)
   }
}


近期评论