今天主要是写了一个服务监听类、消息处理类等。看下图:
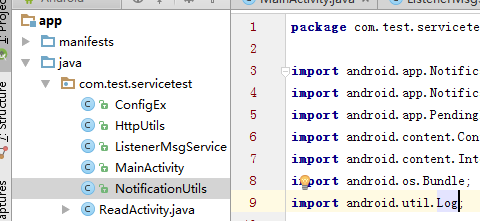
ConfigEx:系统动态配置操作类,用来操作消息的ID。
HttpUtils:http读取文件操作类。
ListenerMsgService:消息服务监听类,就是间隔多少秒自动读取服务器的消息,原理很简单。
NotificationUtils:bar消息发送类。
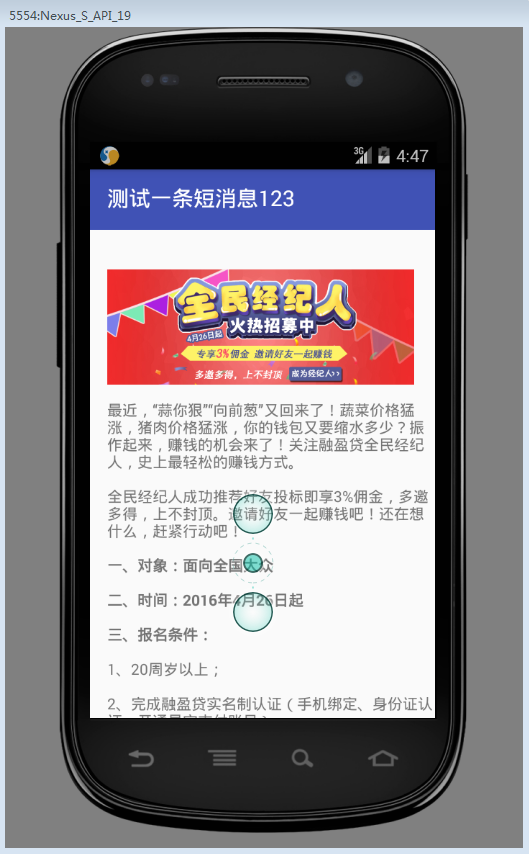
ReadActivity.java:消息读取处理的一个Activity。
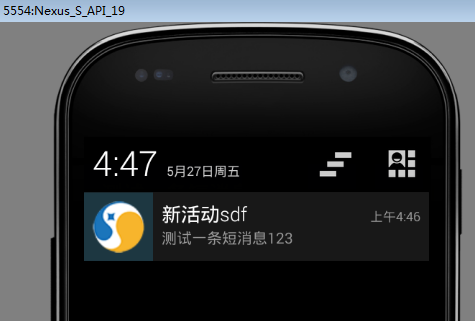
先上一张效果图:
首先来说说,服务:
在MainActivity中创建2个按钮事件:
public void init(Context mContext){
    final Intent intent = new Intent();
    intent.setAction("com.test.servicetest.LISTENERMSGSERVICE");//ListenerMsgSrvice
    final Button start,stop;
    start = (Button)findViewById(R.id.start);
    stop = (Button)findViewById(R.id.stop);

    start.setOnClickListener(new View.OnClickListener() {
        @Override
        public void onClick(View v) {
            startService(intent);
            Log.i("TAG", "startService");
        }
    });

    stop.setOnClickListener(new View.OnClickListener() {
        @Override
        public void onClick(View v) {
           stopService(intent);
            Log.i("TAG","stop");
        }
    });

}
拥有上一段代码还是不可以的,我们必须在androidManifest中申明权限:
<!--另外一个activity申明-->
<activity android:name=".ReadActivity"
   android:label="@string/title2"
   android:theme="@style/AppTheme.NoActionBar">
</activity>
<!--服务声明--> <service android:name=".ListenerMsgService"> <intent-filter> <action android:name="com.test.servicetest.LISTENERMSGSERVICE"></action> </intent-filter> </service><!--权限声明--> <uses-permission android:name="android.permission.INTERNET"></uses-permission>
启动操作做好了,我们现在来写服务类的代码,因为我们使用的是本地服务,所以只需要在onStartCommand实现我们的业务逻辑代码就可以了:
package com.test.servicetest;

import android.app.Service;
import android.content.Intent;
import android.os.Bundle;
import android.os.IBinder;
import android.support.annotation.Nullable;
import android.util.Log;

import org.json.JSONException;
import org.json.JSONObject;

import java.util.Timer;
import java.util.TimerTask;

/**
 * Created by Alan on 2016/05/27 0027.
 */
public class ListenerMsgService extends Service {
    private static final String TAG = "ListenerMsgService";

    private NotificationUtils notification;
    private HttpUtils http;
    private Timer timer;
    private ConfigEx configEx;

    //间隔时间
    private int spacing = 60000;

    //开始时间(毫秒)
    private int startTime = 5000;

    //监听地址
    private String url = "http://192.168.1.205/1.php";
    private Class<?> cls = ReadActivity.class;

    public void onCreate() {
        super.onCreate();

        Log.i(TAG, "OnCreate");
    }

    public int onStartCommand(Intent intent, int flags, int startId) {
        Log.i(TAG, "onStartCommand");
        configEx = new ConfigEx(getApplicationContext(),"config");

        ListenerMsg();
        return START_STICKY;
    }

    public void onDestroy() {
        Log.i(TAG, "onDestroy");
    }

    @Nullable
    @Override
    public IBinder onBind(Intent intent) {
        Log.i(TAG, "onBind");
        return null;
    }

    public boolean onUnbind(Intent intent) {
        Log.i(TAG, "onUnbind");
        return false;
    }

    private void ListenerMsg(){
        timer = new Timer();
        http = new HttpUtils();
        new Thread(new Runnable() {
            @Override
            public void run() {
                timer.schedule(new TimerTask() {
                    @Override
                    public void run() {
                        int _id = configEx.getKeyInt("msg_id");
                        String _url = url;
                        if(url.indexOf("?")>0){
                            _url += "&_id="+_id;
                        }else{
                            _url += "?_id="+_id;
                        }
                        Log.i(TAG,_url);
                        String res = http.Get(_url);

                        if(res!=null && !"".equals(res)){
                            //有新消息
                            try {
                                JSONObject jsonObject = new JSONObject(res);
                                if(jsonObject!=null){

                                    String _title = jsonObject.getString("title");
                                    String _titleSub = jsonObject.getString("titleSub");
                                    String _context = jsonObject.getString("context");
                                    String _time = jsonObject.getString("create_time");

                                    //发送消息数据
                                    Bundle bundle = new Bundle();
                                    bundle.putCharSequence("title",_title);
                                    bundle.putCharSequence("context",_context);
                                    bundle.putCharSequence("time", _time);

                                    //记录ID
                                    configEx.putKey("msg_id",Integer.valueOf(jsonObject.getString("id")));

                                    notification = new NotificationUtils(getApplicationContext());
                                    if(notification.getCount() > 0){
                                        notification.update(cls,_titleSub,_title,_context,bundle);
                                    }else{
                                        notification.send(cls,_titleSub,_title,_context,bundle);
                                    }
                                }

                            } catch (JSONException e) {
                                e.printStackTrace();
                            }

                        }
                    }
                },startTime,spacing);
            }
        }).start();

    }
}
以上的代码就是整个服务监听,可以接收消息,可以显示消息。
以下是ReadActivity.java的全部代码:
package com.test.servicetest;


import android.graphics.drawable.Drawable;
import android.os.Bundle;
import android.os.Handler;
import android.os.Message;
import android.support.v7.app.AppCompatActivity;
import android.support.v7.widget.Toolbar;
import android.text.Html;
import android.text.Spanned;
import android.text.method.LinkMovementMethod;
import android.util.Log;
import android.view.KeyEvent;
import android.widget.TextView;

import java.io.IOException;
import java.io.InputStream;
import java.net.URL;


/**
 * Created by Alan on 2016/05/27 0027.
 */
public class ReadActivity extends AppCompatActivity {
    private  Bundle bundle;
    private  TextView tv;
    private  Spanned spanned;

    @Override
    protected void onCreate(Bundle savedInstanceState) {
        super.onCreate(savedInstanceState);
        setContentView(R.layout.read_main);
        Toolbar toolbar = (Toolbar) findViewById(R.id.toolbar);
        setSupportActionBar(toolbar);


        bundle = getIntent().getExtras();

        tv = (TextView)findViewById(R.id.textView);
        setTitle(bundle.getString("title"));

        final Handler handler = new Handler(){
            public void handleMessage(Message msg) {
                if(msg.getData().getInt("type") == 1){
                    tv.setText(spanned);
                }
            }
        };


        new Thread(new Runnable() {
            @Override
            public void run() {
                spanned = Html.fromHtml(bundle.getString("context"), new ImageGetterEx(),null);
                Bundle _b = new Bundle();
                Message msg = new Message();
                _b.putInt("type", 1);
                msg.setData(_b);
                handler.sendMessage(msg);
            }
        }).start();


        tv.setText(spanned);
        tv.setMovementMethod(LinkMovementMethod.getInstance());


    }

    public boolean onKeyDown(int keyCode,KeyEvent event){
        if (keyCode == KeyEvent.KEYCODE_BACK) {
              finish();
        }
        return true;
    }

}

class ImageGetterEx implements Html.ImageGetter {
    private Drawable drawable = null;
    @Override
    public Drawable getDrawable(final String source) {
        Log.i("Drawable:source:", source);
        InputStream is = null;
        try {
            is = (InputStream) new URL(source).getContent();

        } catch (IOException e) {
            e.printStackTrace();
        }

        drawable = drawable.createFromStream(is,"");
        drawable.setBounds(0, 0, drawable.getIntrinsicWidth(), drawable.getIntrinsicHeight());

        return drawable;
    }
}
//read_main.xml的全部代码:
<?xml version="1.0" encoding="utf-8"?>
<android.support.design.widget.CoordinatorLayout
    xmlns:android="http://schemas.android.com/apk/res/android"
    xmlns:app="http://schemas.android.com/apk/res-auto"
    xmlns:tools="http://schemas.android.com/tools" android:layout_width="match_parent"
    android:layout_height="match_parent" android:fitsSystemWindows="true"
    tools:context=".ReadActivity">

    <android.support.design.widget.AppBarLayout android:layout_height="wrap_content"
        android:layout_width="match_parent" android:theme="@style/AppTheme.AppBarOverlay">

        <android.support.v7.widget.Toolbar android:id="@+id/toolbar"
            android:layout_width="match_parent" android:layout_height="?attr/actionBarSize"
            android:background="?attr/colorPrimary" app:popupTheme="@style/AppTheme.PopupOverlay" />

    </android.support.design.widget.AppBarLayout>

    <LinearLayout xmlns:android="http://schemas.android.com/apk/res/android"
        xmlns:tools="http://schemas.android.com/tools"
        xmlns:app="http://schemas.android.com/apk/res-auto"
        android:layout_width="match_parent"
        android:layout_height="match_parent"

        app:layout_behavior="@string/appbar_scrolling_view_behavior"
        android:orientation="vertical">

        <TextView
            android:layout_width="fill_parent"
            android:layout_height="fill_parent"
            android:scrollbars="vertical"
            android:singleLine="false"
            android:paddingLeft="@dimen/activity_horizontal_margin"

            android:id="@+id/textView"/>


    </LinearLayout>


</android.support.design.widget.CoordinatorLayout>
其他类的代码这里不提供,但是会提供一个下载地址,供需要的人下载:
下载地址链接:http://pan.baidu.com/s/1c1CP8cC 密码:015m

1 Comment
http://192.168.1.205/1.php输出的json内容如下:
$arr = array();
$arr[‘id’] = 241;
$arr[‘title’] = “测试一条短消息123″;
$arr[‘titleSub’] = “新活动sdf”;
$arr[‘context’] = ‘
‘;
$arr[‘create_time’] = time();
echo json_encode($arr);