Spring Cloud(服务注册和发现)
Spring Cloud为开发人员提供了快速构建分布式系统中一些常见模式的工具(例如配置管理,服务发现,断路器,智能路由,微代理,控制总线)。分布式系统的协调导致了样板模式, 使用Spring Cloud开发人员可以快速地支持实现这些模式的服务和应用程序。他们将在任何分布式环境中运行良好,包括开发人员自己的笔记本电脑,裸机数据中心,以及Cloud Foundry等托管平台。
版本:Dalston.RELEASE
特性
Spring Cloud专注于提供良好的开箱即用经验的典型用例和可扩展性机制覆盖。
- 分布式/版本化配置
- 服务注册和发现
- 路由
- service – to – service调用
- 负载均衡
- 断路器
- 分布式消息传递
云原生应用程序
云原生是一种应用开发风格,鼓励在持续交付和价值驱动开发领域轻松采用最佳实践。相关的学科是建立12-factor Apps,其中开发实践与交付和运营目标相一致,例如通过使用声明式编程和管理和监控。Spring Cloud以多种具体方式促进这些开发风格,起点是一组功能,分布式系统中的所有组件都需要或需要时轻松访问。
许多这些功能都由Spring Boot覆盖,我们在Spring Cloud中建立。更多的由Spring Cloud提供为两个库:Spring Cloud Context和Spring Cloud Commons。Spring Cloud上下文为Spring Cloud应用程序(引导上下文,加密,刷新范围和环境端点)的ApplicationContext提供实用程序和特殊服务。Spring Cloud Commons是一组在不同的Spring Cloud实现中使用的抽象和常用类(例如Spring Cloud Netflix vs. Spring Cloud Consul)。
Spring Cloud上下文:应用程序上下文服务
Spring Boot对于如何使用Spring构建应用程序有一个看法:例如它具有常规配置文件的常规位置,以及用于常见管理和监视任务的端点。Spring Cloud建立在此之上,并添加了一些可能系统中所有组件将使用或偶尔需要的功能。
引导应用程序上下文
一个Spring Cloud应用程序通过创建一个“引导”上下文来进行操作,这个上下文是主应用程序的父上下文。开箱即用,负责从外部源加载配置属性,还解密本地外部配置文件中的属性。这两个上下文共享一个Environment,这是任何Spring应用程序的外部属性的来源。Bootstrap属性的优先级高,因此默认情况下不能被本地配置覆盖。
引导上下文使用与主应用程序上下文不同的外部配置约定,因此使用bootstrap.yml,application.yml(或.properties)代替引导和主上下文的外部配置。例:bootstrap.yml
spring:
  application:
    name: foo
  cloud:
    config:
      uri: ${SPRING_CONFIG_URI:http://localhost:8888}
如果您的应用程序需要服务器上的特定于应用程序的配置,那么设置spring.application.name(在bootstrap.yml或application.yml)中是个好主意。
您可以通过设置spring.cloud.bootstrap.enabled=false(例如在系统属性中)来完全禁用引导过程。
应用程序上下文层次结构
如果您从SpringApplication或SpringApplicationBuilder构建应用程序上下文,则将Bootstrap上下文添加为该上下文的父级。这是一个Spring的功能,即子上下文从其父进程继承属性源和配置文件,因此与不使用Spring Cloud Config构建相同上下文相比,“主”应用程序上下文将包含其他属性源。额外的财产来源是:
- “bootstrap”:如果在Bootstrap上下文中找到任何
PropertySourceLocators,则可选CompositePropertySource显示为高优先级,并且具有非空属性。一个例子是来自Spring Cloud Config服务器的属性。
- “applicationConfig:[classpath:bootstrap.yml]”(如果Spring配置文件处于活动状态,则为朋友)。如果您有一个
bootstrap.yml(或属性),那么这些属性用于配置引导上下文,然后在父进程设置时将它们添加到子上下文中。它们的优先级低于application.yml(或属性)以及作为创建Spring Boot应用程序的过程的正常部分添加到子级的任何其他属性源。
由于属性源的排序规则,“引导”条目优先,但请注意,这些条目不包含来自bootstrap.yml的任何数据,它具有非常低的优先级,但可用于设置默认值。
您可以通过简单地设置您创建的任何ApplicationContext的父上下文来扩展上下文层次结构,例如使用自己的界面,或使用SpringApplicationBuilder方便方法(parent(),child()和sibling())。引导环境将是您创建自己的最高级祖先的父级。层次结构中的每个上下文都将有自己的“引导”属性源(可能为空),以避免无意中将值从父级升级到其后代。层次结构中的每个上下文(原则上)也可以具有不同的spring.application.name,因此如果存在配置服务器,则不同的远程属性源。普通的Spring应用程序上下文行为规则适用于属性解析:子环境中的属性通过名称和属性源名称覆盖父项中的属性(如果子级具有与父级名称相同的属性源,一个来自父母的孩子不包括在孩子中)。
请注意,SpringApplicationBuilder允许您在整个层次结构中共享Environment,但这不是默认值。因此,兄弟情境尤其不需要具有相同的资料或财产来源,尽管它们与父母共享共同点。
自定义引导配置
可以通过在org.springframework.cloud.bootstrap.BootstrapConfiguration键下添加条目/META-INF/spring.factories来训练引导上下文来执行任何您喜欢的操作。这是用于创建上下文的Spring @Configuration类的逗号分隔列表。您可以在此处创建要用于自动装配的主应用程序上下文的任何bean,并且还有ApplicationContextInitializer类型的@Beans的特殊合同。如果要控制启动顺序(默认顺序为“最后”),可以使用@Order标记类。
|
警告 |
添加自定义BootstrapConfiguration时,请注意,您添加的类不是错误的@ComponentScanned到您的“主”应用程序上下文中,可能不需要它们。对于您的@ComponentScan或@SpringBootApplication注释配置类尚未涵盖的启动配置类,请使用单独的包名称。 |
引导过程通过将初始化器注入主SpringApplication实例(即正常的Spring Boot启动顺序,无论是作为独立应用程序运行还是部署在应用程序服务器中)结束。首先,从spring.factories中找到的类创建引导上下文,然后在ApplicationContextInitializer类型的所有@Beans添加到主SpringApplication开始之前。
自定义引导属性源
引导过程添加的外部配置的默认属性源是Config Server,但您可以通过将PropertySourceLocator类型的bean添加到引导上下文(通过spring.factories)添加其他源。您可以使用此方法从其他服务器或数据库中插入其他属性。
作为一个例子,请考虑以下微不足道的自定义定位器:
@Configuration
public class CustomPropertySourceLocator implements PropertySourceLocator {

    @Override
    public PropertySource<?> locate(Environment environment) {
        return new MapPropertySource("customProperty",
                Collections.<String, Object>singletonMap("property.from.sample.custom.source", "worked as intended"));
    }

}
传入的Environment是要创建的ApplicationContext的Environment,即为我们提供额外的属性来源的。它将已经具有正常的Spring Boot提供的资源来源,因此您可以使用它们来定位特定于此Environment的属性源(例如通过将其绑定在spring.application.name上,如在默认情况下所做的那样Config Server属性源定位器)。
如果你在这个类中创建一个jar,然后添加一个META-INF/spring.factories包含:
org.springframework.cloud.bootstrap.BootstrapConfiguration=sample.custom.CustomPropertySourceLocator
那么“customProperty”PropertySource将显示在其类路径中包含该jar的任何应用程序中。
环境变化
应用程序将收听EnvironmentChangeEvent,并以几种标准方式进行更改(用户可以以常规方式添加ApplicationListeners附加ApplicationListeners)。当观察到EnvironmentChangeEvent时,它将有一个已更改的键值列表,应用程序将使用以下内容:
- 重新绑定上下文中的任何
@ConfigurationProperties bean
- 为
logging.level.*中的任何属性设置记录器级别
请注意,配置客户端不会通过默认轮询查找Environment中的更改,通常我们不建议检测更改的方法(尽管可以使用@Scheduled注释进行设置)。如果您有一个扩展的客户端应用程序,那么最好将EnvironmentChangeEvent广播到所有实例,而不是让它们轮询更改(例如使用Spring Cloud总线)。
EnvironmentChangeEvent涵盖了大量的刷新用例,只要您真的可以更改Environment并发布事件(这些API是公开的,部分内核为Spring)。您可以通过访问/configprops端点(普通Spring Boot执行器功能)来验证更改是否绑定到@ConfigurationProperties bean。例如,DataSource可以在运行时更改其maxPoolSize(由Spring Boot创建的默认DataSource是一个@ConfigurationProperties bean),并且动态增加容量。重新绑定@ConfigurationProperties不会覆盖另一大类用例,您需要更多的控制刷新,并且您需要更改在整个ApplicationContext上是原子的。为了解决这些担忧,我们有@RefreshScope。
刷新范围
当配置更改时,标有@RefreshScope的Spring @Bean将得到特殊处理。这解决了状态bean在初始化时只注入配置的问题。例如,如果通过Environment更改数据库URL时DataSource有开放连接,那么我们可能希望这些连接的持有人能够完成他们正在做的工作。然后下一次有人从游泳池借用一个连接,他得到一个新的URL。
刷新范围bean是在使用时初始化的懒惰代理(即当调用一个方法时),并且作用域作为初始值的缓存。要强制bean重新初始化下一个方法调用,您只需要使其缓存条目无效。
RefreshScope是上下文中的一个bean,它有一个公共方法refreshAll()来清除目标缓存中的范围内的所有bean。还有一个refresh(String)方法可以按名称刷新单个bean。此功能在/refresh端点(通过HTTP或JMX)中公开。
|
注意 |
@RefreshScope(技术上)在@Configuration类上工作,但可能会导致令人惊讶的行为:例如,这并不 意味着该类中定义的所有@Beans本身都是@RefreshScope。具体来说,任何取决于这些bean的东西都不能依赖它们在刷新启动时被更新,除非它本身在@RefreshScope(在其中将重新刷新并重新注入其依赖关系),那么它们将从刷新的@Configuration)重新初始化。 |
加密和解密
Spring Cloud具有一个用于在本地解密属性值的Environment预处理器。它遵循与Config Server相同的规则,并通过encrypt.*具有相同的外部配置。因此,您可以使用{cipher}*格式的加密值,只要有一个有效的密钥,那么在主应用程序上下文获取Environment之前,它们将被解密。要在应用程序中使用加密功能,您需要在您的类路径中包含Spring安全性RSA(Maven协调“org.springframework.security:spring-security-rsa”),并且还需要全面强大的JCE扩展你的JVM
端点
对于Spring Boot执行器应用程序,还有一些额外的管理端点:
- POST到
/env以更新Environment并重新绑定@ConfigurationProperties和日志级别
/refresh重新加载引导带上下文并刷新@RefreshScope bean/restart关闭ApplicationContext并重新启动(默认情况下禁用)/pause和/resume调用Lifecycle方法(stop()和start() ApplicationContext)
例子:
建立EurekaServer服务端
@EnableEurekaServer
@SpringBootApplication
public class ServerApplication {

    public static void main(String[] args) {
        SpringApplication.run(ServerApplication.class, args);
    }

}
EurekaServer服务端pom.xml
<dependencies>
    <dependency>
        <groupId>org.springframework.cloud</groupId>
        <artifactId>spring-cloud-config-server</artifactId>
    </dependency>
    <dependency>
        <groupId>org.springframework.cloud</groupId>
        <artifactId>spring-cloud-starter</artifactId>
    </dependency>
    <dependency>
        <groupId>org.springframework.cloud</groupId>
        <artifactId>spring-cloud-starter-netflix-eureka-client</artifactId>
    </dependency>
    <dependency>
        <groupId>org.springframework.cloud</groupId>
        <artifactId>spring-cloud-starter-netflix-eureka-server</artifactId>
    </dependency>

    <dependency>
        <groupId>org.springframework.boot</groupId>
        <artifactId>spring-boot-starter-test</artifactId>
        <scope>test</scope>
    </dependency>
</dependencies>
EurekaServer服务端application.properties
server.port=7080

eureka.instance.hostname=localhost
eureka.client.register-with-eureka=false
eureka.client.fetch-registry=false
eureka.client.service-url.defaultZone=http://127.0.0.1:7080/eureka/
*注:这里defaultZone必须是驼峰法,否则会出现连接服务端失败的错误。
建立EurekaClient客户端
@EnableEurekaClient
@EnableWebMvc
@SpringBootApplication
public class Demo1Application {

    public static void main(String[] args) {
        SpringApplication.run(Demo1Application.class, args);
    }

}
Eureka客户端pom.xml
<dependencies>
    <dependency>
        <groupId>org.springframework.boot</groupId>
        <artifactId>spring-boot-starter-web</artifactId>
    </dependency>
    <dependency>
        <groupId>org.springframework.cloud</groupId>
        <artifactId>spring-cloud-starter-netflix-eureka-client</artifactId>
    </dependency>

    <dependency>
        <groupId>org.mybatis.spring.boot</groupId>
        <artifactId>mybatis-spring-boot-starter</artifactId>
        <version>2.0.0</version>
    </dependency>
    <dependency>
        <groupId>mysql</groupId>
        <artifactId>mysql-connector-java</artifactId>
        <scope>runtime</scope>
    </dependency>
    <dependency>
        <groupId>org.springframework.boot</groupId>
        <artifactId>spring-boot-starter-test</artifactId>
        <scope>test</scope>
    </dependency>
</dependencies>
Eureka客户端application.properties
server.port=7081
eureka.instance.hostname=localhost
eureka.client.register-with-eureka=true
eureka.client.fetch-registry=true
eureka.client.service-url.defaultZone=http://127.0.0.1:7080/eureka/


spring.application.name=Eureka-Demo-Client

spring.datasource.url=jdbc:mysql://127.0.0.1/test
spring.datasource.username=root
spring.datasource.password=root
*注:这里defaultZone必须是驼峰法,否则会出现连接服务端失败的错误。
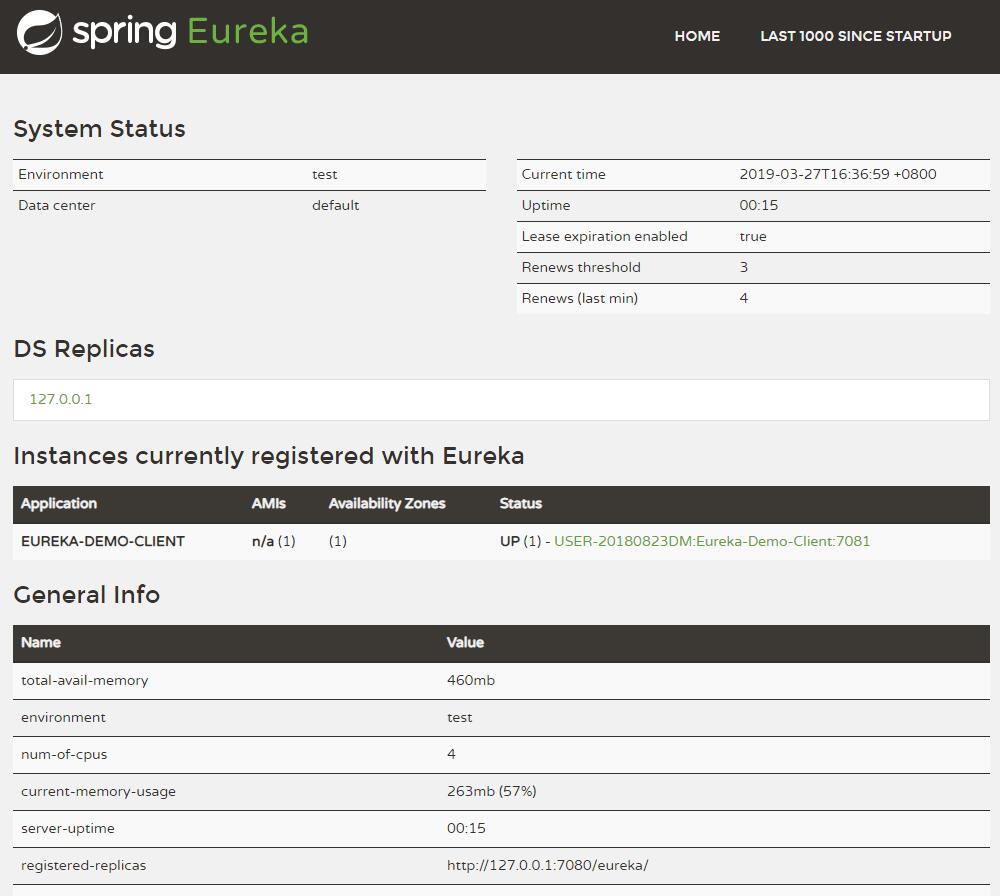
Eureka运行截图

近期评论